Author: info@pass4you.co.uk

  • Emergency Stop Procedure UK Driving Test: The 2026 Learner’s Guide

    Did you know that the emergency stop is now only requested in about 1 in 7 UK driving tests? While the DVSA reduced the frequency to roughly 14% of tests in late 2025, the pressure to get it right hasn’t changed. It’s completely natural to feel a flutter of “brake panic” when you think about the examiner suddenly calling out for you to stop. You might worry about skidding, losing control, or the common confusion of exactly when to use the clutch. We understand those nerves, and we’re here to help you turn that anxiety into quiet confidence.

    This guide will help you master the emergency stop procedure uk driving test by breaking down exactly what the examiner expects in 2026. You’ll learn the precise footwork needed for manual cars, how modern technology like ABS keeps you safe, and how to react instantly to the examiner’s signal. We’ll walk you through the process step by step, from the moment you hear the command to the final safety checks before moving off again. By the time you finish reading, you’ll have a clear roadmap to performing this maneuver smoothly, ensuring you feel prepared and professional on your test day.

    Key Takeaways

    • Understand the specific criteria DVSA examiners use to grade your performance, ensuring you meet the highest safety standards for 2026.
    • Master the correct footwork for the emergency stop procedure uk driving test, including the vital timing of the clutch and brake pedals.
    • Learn how to maintain a straight path and avoid common control issues that often cause anxiety for learner drivers.
    • Gain peace of mind by knowing exactly what happens after the stop, including the essential safety observations needed before you continue your drive.
    • Discover how expert guidance during your driving lessons can build the muscle memory required to handle sudden stops with complete confidence.

    What is the Emergency Stop Procedure in the 2026 Driving Test?

    The emergency stop is often the one part of the test that makes learner drivers feel most anxious. It’s a controlled maneuver designed to bring your car to a complete halt as quickly and safely as possible. While it might sound intimidating, it’s a vital skill that ensures you can handle unexpected hazards on the road. In the current UK driving test procedure, examiners use this exercise to assess two main things: how fast you react and how well you keep the car under control during heavy braking. We focus on helping you feel calm so that your feet do exactly what they’ve been trained to do without hesitation.

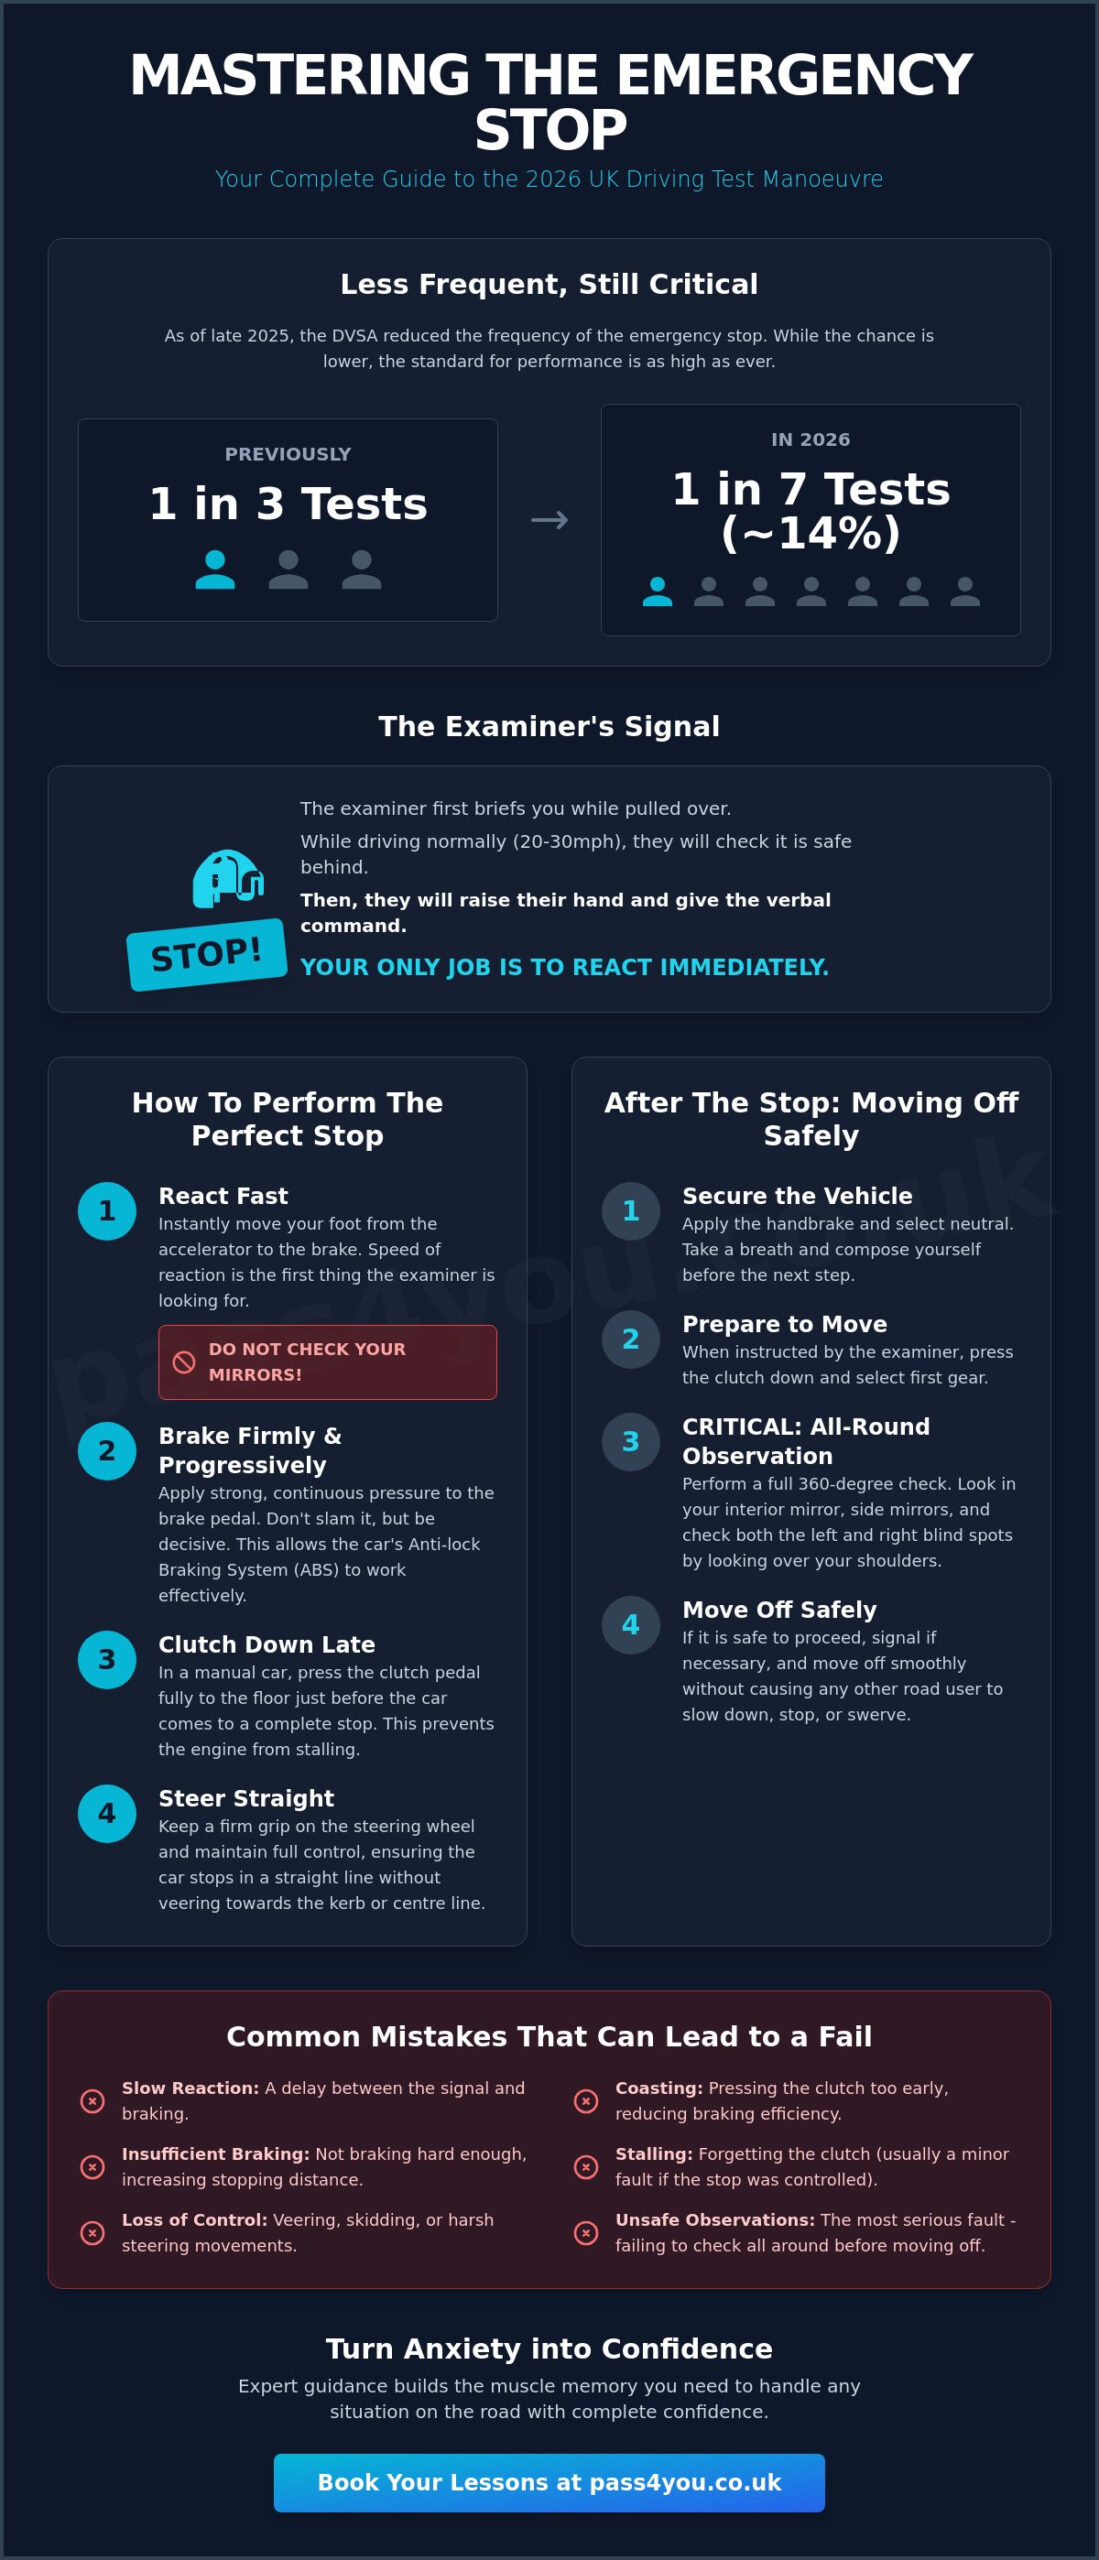
    You might have heard from friends or older relatives that you’re almost certain to perform this during your test. However, as of late 2025, the DVSA updated the frequency of this exercise to better reflect modern road conditions. In 2026, you actually only have a 1 in 7 chance of being asked to perform an emergency stop. This means it happens in roughly 14% of practical tests, a significant drop from the old 1 in 3 frequency. Even though it’s less common, your instructor will still make sure you’ve mastered the emergency stop procedure uk driving test. It’s always conducted on a safe, straight stretch of road where there’s minimal risk to other road users.

    When and How the Examiner Will Signal

    Before the exercise begins, the examiner will ask you to pull over to the side of the road. They’ll explain exactly what’s about to happen so there are no surprises. They’ll tell you that they’ll give a specific signal and that you should stop the car as if an emergency has occurred. They’ll also specify that you shouldn’t check your mirrors before braking, as in a real emergency, every millisecond counts.

    Once you move off and are driving normally, usually at a speed of 20 to 30mph, the examiner will look over their shoulder to ensure it’s safe behind you. Then, they’ll suddenly raise their hand and shout “STOP!” clearly. Your only job is to react immediately. You’ll need to apply the brakes firmly and progressively. During your driving lessons, we practice this until it becomes second nature, so you won’t feel startled when the shout finally comes.

    Why Safety is the Priority

    The main goal is to stop the car in the shortest distance possible while keeping it stable. This maneuver mimics a real-life situation, like a child stepping into the road or a car pulling out unexpectedly. If you take too long to hit the brakes or let the car veer toward the curb, it shows a lack of control. By using a firm, steady pressure, you allow the car’s safety systems to work effectively. The emergency stop is a test of your ability to provide a prompt, controlled reaction to a sudden hazard.

    Step-by-Step: How to Perform a Test-Standard Emergency Stop

    When the examiner gives the signal, your first priority is speed of reaction. You must move your right foot from the accelerator to the brake pedal instantly. Do not look in your mirrors. While this feels counterintuitive to everything you have learned in your driving lessons so far, a split second spent looking at the glass is a split second where the car is still moving at speed. Your goal is to stop the vehicle as quickly as possible while keeping it under full control.

    The way you apply the brake is just as vital as how fast you reach it. You should apply firm, progressive pressure. This means you don’t “stab” or “slam” the brake suddenly, which can cause the car to pitch forward violently or lose grip. Instead, push the pedal hard and keep that pressure steady until the car has stopped. Modern braking systems are designed to handle this force, and your car will respond best to a deliberate, strong input. Practicing this during your driving lessons with a supportive instructor will help you find the right balance of strength and smoothness.

    As the car slows down, you need to manage the clutch. If you’re driving a manual car, depress the clutch pedal fully just before the car comes to a complete standstill. This prevents the engine from stalling while ensuring you benefit from engine braking for as long as possible. If you press the clutch too early, the car might “coast,” which reduces your control. If you press it too late, the car might shudder or stall. Don’t worry if you do stall during the test; as long as the stop was safe and controlled, a stall is usually considered a minor fault rather than a fail.

    The “No Mirror Rule” Explained

    In almost every other driving situation, The Highway Code emphasizes the importance of checking your mirrors before changing speed or direction. However, the emergency stop procedure uk driving test is the one big exception. The examiner has already checked the road behind you to ensure it is clear and safe before giving the signal. In a real-world emergency, taking the time to check your mirrors could be the difference between a near-miss and a collision. Trust that the area is clear and focus entirely on stopping the car.

    Post-Stop Safety Checks

    Once the car has reached a total halt, keep your feet firmly on the pedals. Your first task is to secure the car by applying the handbrake and selecting neutral. This is a great moment to take a deep breath and settle your heart rate. The examiner will usually say, “Thank you, move off when you’re ready.” Before you put the car back into gear, you must perform a thorough, 360-degree observation. Check both blind spots and all mirrors. You are looking for pedestrians, cyclists, or other vehicles that may have approached while you were stopped. Only move off when you are 100% certain it is safe to rejoin the flow of traffic.

    Emergency Stop Procedure UK Driving Test: The 2026 Learner’s Guide

    Modern Car Tech: ABS and Stopping Distances in 2026

    Modern cars are equipped with sophisticated systems that take much of the guesswork out of sudden braking. In 2026, almost every tuition vehicle, including the modern Volkswagens we use for our driving lessons, comes fitted with an Anti-lock Braking System (ABS). This technology is a game changer for learner drivers. It works by monitoring the speed of each wheel and automatically releasing the brakes for a fraction of a second if it detects a wheel is about to lock up. This prevents the car from skidding and allows you to maintain steering control even under maximum braking pressure.

    One of the most important things to prepare for is the physical feedback from the car. When you perform the emergency stop procedure uk driving test in an ABS-equipped vehicle, you might feel the brake pedal vibrate or pulse under your foot. You might also hear a mechanical grinding or thumping sound. Don’t let this alarm you. It’s simply the system working at high speed to keep you safe. Many students instinctively lift their foot when they feel this vibration, but you must keep the pressure firm and steady until the car has stopped completely.

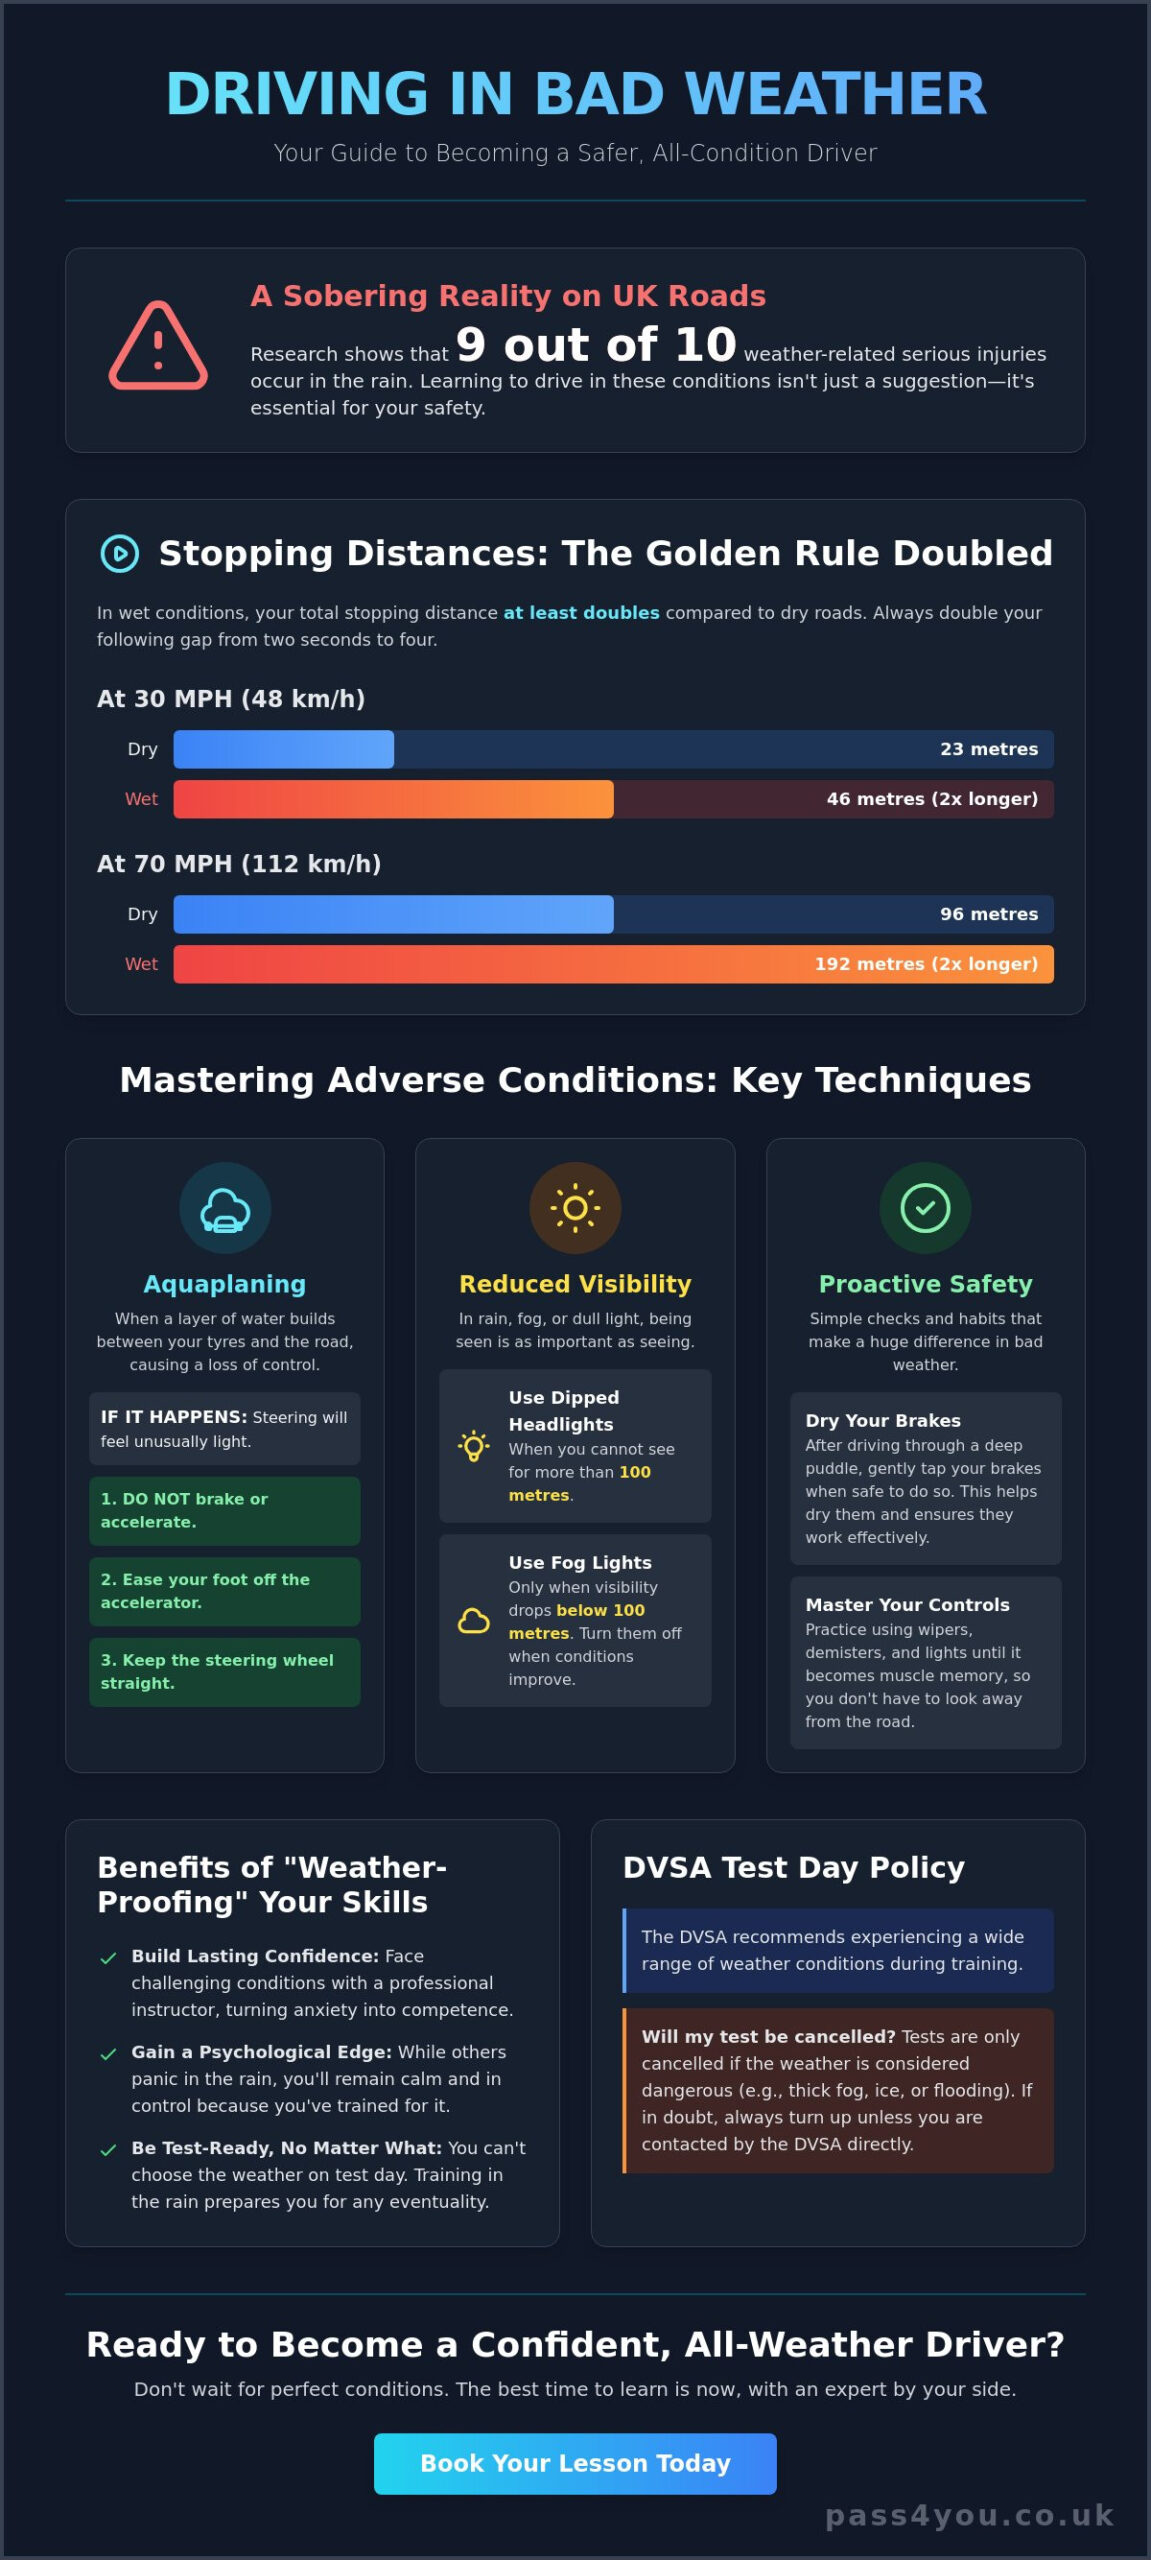
    Understanding your environment is just as critical as knowing the car’s tech. The Official Highway Code Emergency Stop Procedure highlights that stopping distances are heavily influenced by the road surface. In dry conditions, we follow the 2-second rule to maintain a safe gap from the vehicle in front. However, once the weather turns, those distances change dramatically. ABS is a safety aid that helps you maintain control, but it isn’t a replacement for good tires or sensible speed for the conditions.

    How ABS Changes Your Reaction

    Years ago, drivers were taught to “pump” the brakes to prevent a skid. With modern ABS, this is no longer necessary and can actually be dangerous. You should push the brake pedal hard and hold it there. The car’s computer will handle the “pumping” much faster than any human could. This technology also means that if a hazard moves, you can still steer the car while the brakes are fully applied, which is a life-saving advantage in real-world emergencies.

    Weather Conditions and Stopping Distances

    Rain doubles your stopping distance because the water reduces the friction between your tires and the road. If there’s ice, that distance can increase by up to ten times. Your examiner is trained to prioritize safety above all else. They won’t ask you to perform an emergency stop if the road is dangerously slippery or if visibility is too poor to conduct the exercise safely. We always teach our students to respect these limits, ensuring you’re a responsible driver long after you’ve passed your test.

    Common Mistakes That Can Lead to a Test Fail

    Even with the best preparation, the high pressure of a test environment can sometimes lead to simple errors. We want you to feel as relaxed as possible, so understanding where others often trip up is a great way to stay focused. One frequent issue is a delayed reaction time. If you hesitate even for a moment after the examiner gives the signal, it suggests you might not be ready for a real-world hazard. The emergency stop procedure uk driving test requires an immediate response to ensure the shortest possible stopping distance.

    Vehicle control is another area where learners sometimes struggle. It’s common for students to accidentally pull the steering wheel toward the curb while they are braking hard. You must keep the car traveling in a straight line. Excessive skidding can also be a concern, although modern ABS technology makes this much less likely than it used to be. Another technical slip-up involves clutch timing. If you depress the clutch too early, you lose the benefit of engine braking, which is known as coasting. If you press it too late, you might stall the engine.

    The mistake that surprises many learners happens after the car has actually stopped. Once you’ve successfully brought the car to a halt, the relief can be overwhelming. However, you must not forget your safety observations. Moving off without a full 360-degree blind-spot check is one of the most common reasons for a major fault during this exercise. If you want to refine these skills with a mentor who understands your nerves, you can book your driving lessons with our experienced team today.

    Minor vs. Major Faults

    It’s helpful to know that not every mistake results in an immediate fail. A slight stall, for instance, is often recorded as a minor fault if you handle it calmly and restart the car safely. However, failing to look around properly before moving off is almost always a major fault because it creates a direct safety risk. Similarly, if your braking is so harsh or poorly timed that you lose significant control of the car’s direction, the examiner may mark it as a major fault.

    How to Recover from a Stall

    If the car stalls during your emergency stop, don’t panic. Keep your feet firmly on the pedals and apply the handbrake immediately to secure the vehicle. Take a second to compose yourself, then restart the engine calmly. Examiners actually value your ability to stay composed and fix a problem without getting flustered. For more expert advice on navigating your big day, take a look at our guide on Mastering the Practical Driving Test in 2026. Staying calm is the best way to show you’re a safe, capable driver.

    Mastering the Emergency Stop with Pass4you Milton Keynes

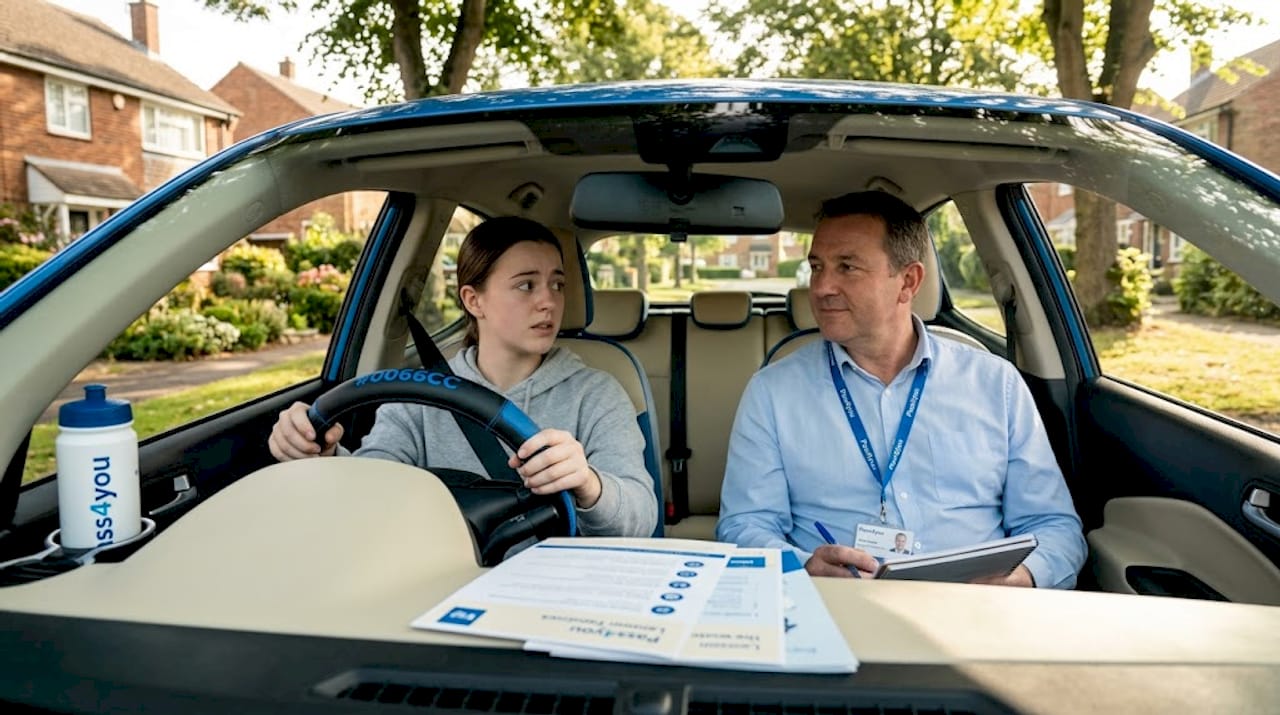
    Learning to handle a vehicle during a sudden stop is about more than just fast feet. It’s about having the mental space to stay calm under pressure. The instructors at Pass4you Driving School specialize in this exact area, helping you build the confidence needed for high-pressure maneuvers. We use modern Volkswagen vehicles equipped with top-tier safety features, ensuring you feel secure while practicing. By training on local Milton Keynes roads, we prepare you for the specific conditions you’ll face during your actual test. This focused approach is a major reason why we maintain a high-precision success metric of an 83.33% first-time pass rate.

    We believe every learner deserves a supportive environment. The emergency stop procedure uk driving test is a test of your reflexes, but those reflexes work best when you aren’t overwhelmed by anxiety. Our team at Pass4you Driving School is dedicated to turning your test nerves into a professional mindset. We focus on the small details, like the feel of the brake pedal and the timing of the clutch, until they become second nature. This level of preparation means that when the examiner finally gives the signal, you won’t be surprised. You’ll simply react with the skill we’ve helped you develop through consistent, patient practice.

    Patient Instruction for Anxious Learners

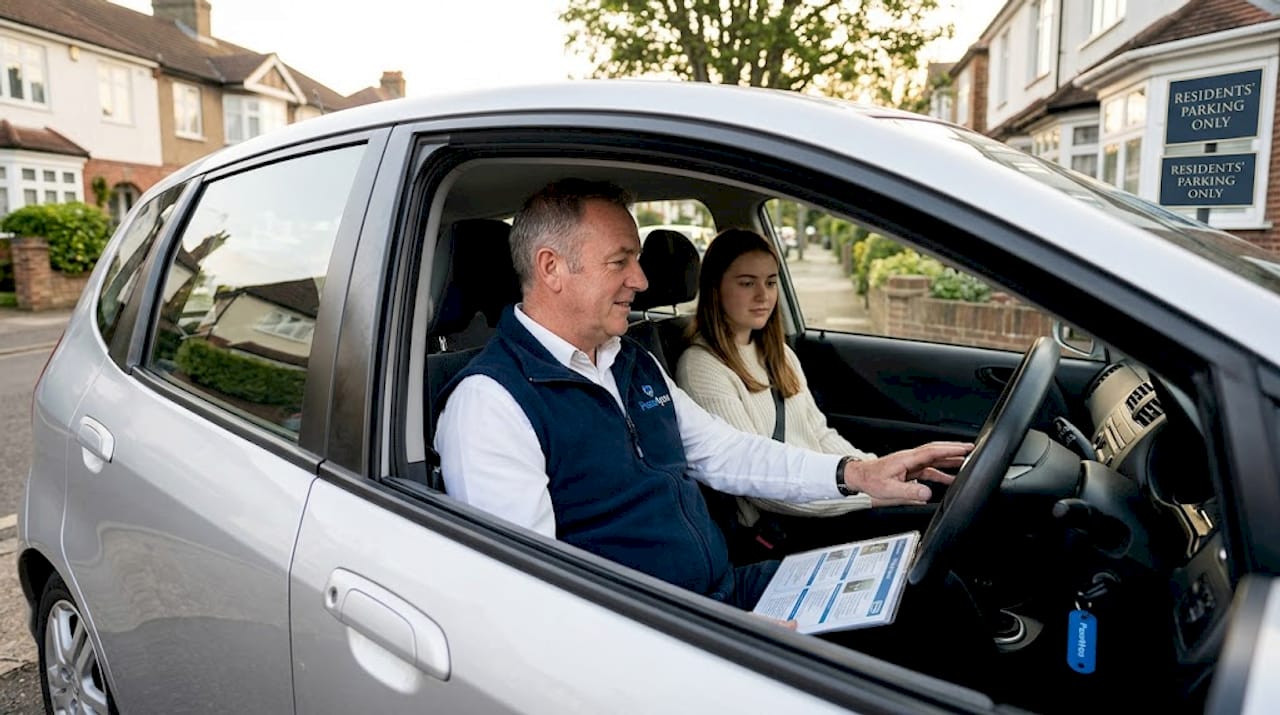
    We never rush the learning process. We move at your pace, ensuring you’re comfortable with the car before we ever simulate the maneuver at speed. Our mock tests always include the emergency stop to help desensitize you to the signal. This practice turns a scary moment into a routine reaction. Relying on informal practice with friends can sometimes lead to missed details that result in test failures. Our structured driving lessons provide the professional edge you need to master the emergency stop procedure uk driving test. For a deeper look at how we support our students, check out our Driving Lessons Milton Keynes: The Ultimate Guide.

    Ready to Pass First Time?

    Investing in professional instruction is the most effective way to save time and money in the long run. While it’s tempting to look for the cheapest option, the value of effective, high-quality coaching from Pass4you Driving School cannot be overstated. We focus on the precision and calm required to pass on your first attempt, helping you avoid the cost of retakes. Join the hundreds of successful drivers in Milton Keynes who’ve already gained their freedom with our help. We’re ready to help you reach your goals and drive safely for life. Book your first lesson with Pass4you Driving School today and take the first step toward your license.

    Take the Next Step Toward Your Driving Freedom

    You’ve now seen that the emergency stop isn’t something to fear; it’s a controlled response that keeps everyone safe. By understanding the mechanical feedback of your car and the importance of those final safety checks, you’re already ahead of the curve. Mastering the emergency stop procedure uk driving test is about more than just passing a single exercise. It’s about developing the instincts that will make you a safer driver for years to come.

    We’re here to ensure those instincts become second nature in a calm, stress-free environment. Our Milton Keynes instructors are experts at helping you translate this knowledge into smooth, confident action on the road. Don’t let a single maneuver stand between you and your independence. Start your journey to a first-time pass with Pass4you Driving School and join our community of successful, confident drivers. Your full license is closer than you think, and we’re excited to help you get there.

    Frequently Asked Questions

    Do I need to check my mirrors during the emergency stop?

    No, you should not check your mirrors before performing the stop. The examiner has already looked behind to ensure it is safe before giving the signal. Your priority is to react immediately to the command. Taking time to check mirrors in a real emergency would increase your stopping distance, so focusing entirely on the road ahead is the safest approach.

    Will I fail my driving test if I stall during an emergency stop?

    Stalling the engine isn’t an automatic fail. If you manage the stop safely and then restart the car calmly, the examiner will likely record it as a minor fault. The key is to stay composed, secure the car with the handbrake, and perform your safety checks before moving off again. Showing that you can handle a small mistake with confidence is a great way to impress.

    How many times will the examiner ask me to do an emergency stop?

    The examiner will only ask you to perform the emergency stop once during your test. It’s important to remember that as of late 2025, this exercise only occurs in 1 out of 7 tests. While you might not even be asked to do it, your driving lessons will ensure you’re fully prepared just in case it is your turn.

    What happens if the car skids during the maneuver?

    If the car skids, keep your feet firmly on the pedals and maintain a straight steering path. Most modern cars have ABS to prevent this, but if you do feel a loss of grip, don’t pump the brakes. Just keep the pressure steady and the car pointed forward. Your instructor will help you practice this until the emergency stop procedure uk driving test feels like second nature.

    Is the emergency stop procedure different in an automatic car?

    The procedure is simpler in an automatic car because there is no clutch pedal to manage. You simply use your right foot to apply firm, progressive pressure to the brake until the car stops. Since you don’t have to worry about stalling, you can focus entirely on your reaction time and keeping the steering wheel straight.

    Can I use the footbrake and handbrake together to stop faster?

    No, you should only use the footbrake to stop the car. Using the handbrake while the car is moving can cause the rear wheels to lock up and result in a dangerous skid. The handbrake should only be applied once the vehicle has come to a complete standstill to secure it safely and prevent it from rolling.

    How do I know if the road is safe to practice an emergency stop in Milton Keynes?

    When practicing in Milton Keynes, look for quiet, straight residential roads with clear visibility and no parked cars nearby. Your instructor will guide you to the best locations that mimic the areas used by examiners. Always ensure there are no pedestrians or other road users close by who might be startled by a sudden stop.

    What is the most common reason for failing the emergency stop?

    The most common reason for failing the emergency stop procedure uk driving test is failing to check blind spots before moving off. After the stop is finished, many learners feel so relieved that they forget to look around. You must perform a full 360-degree check to ensure it is safe to rejoin the traffic, as neglecting this is usually marked as a major fault.

  • The real role of residential street driving lessons

    The real role of residential street driving lessons

    Most learners begin behind the wheel in an empty car park, practising clutch control and basic manoeuvres with no real pressure around them. That is useful. But the role of residential street driving lesson practice goes far beyond what any car park can teach. It is where real road skills actually form. Quiet neighbourhood streets introduce signage, junctions, pedestrians, and unpredictable situations in a setting that is challenging enough to matter but forgiving enough to learn from. If you are a learner driver or a parent trying to understand what proper driving progression looks like, this article explains exactly why residential streets are the most important stage of early driver training.

    Table of Contents

    Key takeaways

    Point Details
    Car parks have clear limits Initial practice builds basic control but cannot replicate real road conditions or hazards.
    Residential streets are the ideal middle ground They introduce genuine road rules and traffic without the pressure of busy main roads.
    Core skills develop here first Speed judgement, mirror use, signalling, and hazard awareness are all formed in residential environments.
    Structured lessons accelerate progress A professional instructor on residential roads provides feedback that parents and self-practice simply cannot match.
    Confidence grows through repetition Repeated practice on familiar residential routes builds the spatial memory learners need for independent driving.

    The role of residential street driving lessons in your progression

    Learning to drive follows a natural sequence, and skipping steps creates gaps that often show up on test day. Most learners start with car park sessions because there is no traffic, no time pressure, and space to make mistakes without consequences. That environment builds the basics: moving off smoothly, steering accurately, and understanding how the vehicle responds. It is a necessary foundation.

    The problem is that car parks are almost nothing like real roads. There are no speed limits to observe, no junctions to read, no cyclists appearing unexpectedly from side streets. A learner who spends too long in a car park often develops a false sense of readiness. The car feels familiar, but the road still feels foreign.

    Gradual movement from car parks to residential streets helps learners experience real-world situations with minimal traffic, which is exactly what makes residential streets such an effective transitional environment. You get the genuine elements of road driving, signage, parked cars, junctions, pedestrians, and light moving traffic, but at a pace and complexity level that does not overwhelm a learner who is still building their confidence.

    Here is what a well-structured progression into residential streets typically looks like:

    1. Car park basics: Moving off, stopping, steering control, and simple manoeuvres.
    2. Quiet residential roads with no traffic: Learning to read road markings, signs, and junctions without the pressure of other vehicles.
    3. Residential streets with light traffic: Managing space, signalling, and responding to other road users in real time.
    4. Busier residential areas and minor roads: Handling junctions, give-way situations, and pedestrian crossings with confidence.
    5. Main roads and dual carriageways: High-speed environments introduced only once foundational skills are solid.

    Pro Tip: If you are a parent supervising practice, choose the same two or three residential streets for the first few sessions. Familiarity with the layout lets your learner focus on technique rather than uncertainty about what comes next.

    Core skills built on residential streets

    This is where the importance of residential driving lessons becomes concrete. The skills a learner builds on quiet neighbourhood roads are not warm-up skills. They are the skills that appear on every DVSA driving test examiner’s checklist.

    Speed management is the first real challenge. In a car park, there is no speed limit to follow. On a residential street, a learner must read the signs, adjust their speed accordingly, and understand why 20mph or 30mph limits exist. Getting this wrong in a car park has no consequences. Getting it wrong on a test or as a new independent driver absolutely does.

    Learner navigating speed limits residential road

    Right-of-way at junctions is another skill that only develops with genuine practice. Understanding and applying road rules in lower-stress environments prepares learners for the more complex decisions they will face on main roads later. A T-junction on a quiet estate may feel simple, but it teaches the learner to look, assess, and commit to a decision. That decision-making process is the same one they will need on a busy high street, just with more variables.

    Mirrors and signalling are habits, not skills. The only way to build a habit is through repetition in context. A learner who signals correctly on a residential street because there happens to be a pedestrian watching is developing the right instinct. Practising these core rules in residential areas transfers directly to test performance and lifelong safe driving.

    Then there is hazard awareness. Residential streets have a particular set of hazards that other environments simply do not replicate:

    • Children stepping out from between parked cars.
    • Cyclists who may ride unpredictably or without lights.
    • Delivery vehicles partially blocking the road.
    • Parked cars opening doors into the lane.
    • Drivers reversing out of driveways with limited visibility.

    Learners who practise on residential streets develop the kind of anticipatory thinking that separates safe drivers from reactive ones. This is not a skill you can practise in an empty car park.

    Research from cognitive science supports this too. Repeated practice on familiar routes builds spatial memory and cognitive mapping, which means learners gradually integrate new driving information with what they already know about a neighbourhood. This is why confident drivers can hold a conversation while navigating a familiar area, and why newer drivers should start somewhere recognisable.

    Pro Tip: After each session, ask your learner to describe one hazard they noticed and how they responded to it. This brief verbal review locks in awareness and encourages the reflective thinking that professional instructors call “commentary driving.”

    Comparing residential streets with other learning environments

    Not every practice environment serves the same purpose. Understanding where residential streets sit in relation to other options helps learners and parents make better decisions about where to spend practice time.

    Environment Best suited for Limitations
    Car park Basic vehicle control and manoeuvres No real traffic, no road rules in context
    Quiet rural road Building speed confidence away from traffic Different hazard profile, few junctions or pedestrians
    Residential street Developing core road skills in low-to-moderate traffic Not ideal for high-speed or dual carriageway practice
    Main road or town centre Advanced driving and test-condition preparation Too complex for early-stage learners

    Residential streets provide moderate complexity that exposes learners to signs, junctions, pedestrians, and variable conditions without the pressure of heavy traffic. Rural roads, by contrast, tend to have fewer junctions and almost no pedestrian activity, which means they do not build the same range of skills. Main roads are better saved for the later stages of training when a learner has the processing capacity to handle multiple competing demands simultaneously.

    Infographic comparing street and car park driving skills

    The key point here is that no single environment is sufficient on its own. Residential street practice is not the end goal. It is the critical middle stage that makes every other type of driving feel more manageable.

    Practical tips for getting the most from residential lessons

    Whether you are practising with a parent or working with a professional instructor, the benefits of street driving practice depend on how you approach each session.

    • Choose streets that match your current ability. Start with genuinely quiet roads with minimal parked cars. As confidence grows, move to streets with more activity.
    • Set a specific goal for each session. “Today we will focus on signalling at every junction” is far more productive than a general drive around the block.
    • Prioritise patience over distance. Covering two kilometres with full awareness is more valuable than ten kilometres on autopilot.
    • Repeated practice on familiar routes builds confidence through familiarity, reducing the hesitation and anxiety that often appear on test day.
    • Give feedback after the session, not during it. Correcting a learner mid-drive creates anxiety. Save detailed feedback for when the car is stopped.
    • Know when to bring in a professional. Certified instructors offer clear, unbiased feedback that helps learners progress steadily, and they remove the emotional pressure that can sometimes build between parent and child.

    Pro Tip: Before each residential practice session, check that your tyre tread depth meets the legal minimum of 1.6mm. Residential roads include wet patches, sharp corners, and emergency stops. A car in poor condition undermines every skill the learner is trying to build.

    Choosing quiet residential streets with realistic goals and gradual increases in difficulty is the single most effective formula for confident, test-ready learners. The structured approach taken by professional driving schools mirrors exactly this method, which is why their pass rates consistently outperform unsupervised private practice.

    My honest take on residential driving lessons

    I have seen learners arrive for their first lesson having logged thirty or forty hours in a car park with a parent. They can control the car beautifully. And then they freeze the moment another vehicle appears at a junction.

    In my experience, the gap is almost always the same. They were never given enough time on residential streets before being pushed onto busy roads. Parents often rush this stage because the car park feels boring and the main road feels like “real driving.” But the residential street is where safe habits actually form. It is not a stepping stone you can skip.

    What I have also noticed is that learners who spend time on the same residential streets repeatedly develop something you cannot teach directly: calm. Familiarity with a route lets the brain stop processing geography and start processing hazards. That shift is where confident driving begins. You can explore more resources for learners to support this kind of progressive practice.

    The mistake I see parents make most often is treating residential street driving as a rehearsal for the real thing. It is not a rehearsal. It is the real thing. The habits built here become the reflexes a driver uses for life.

    — Simon

    Ready to build real confidence on the road?

    At Pass4you, residential street practice is built into every learner programme from the very first lesson. Our instructors work with you at your pace, guiding you through quiet streets and gradually introducing more complex road environments as your ability grows.

    https://pass4you.co.uk

    Our learner driving courses are delivered in dual-control Volkswagen vehicles by calm, experienced instructors who know the local roads around Milton Keynes inside out. With an 83.33% first-time pass rate, we know what works. Whether you prefer a steady weekly lesson schedule or want to accelerate with an intensive course, Pass4you has the right option for you. Get in touch today to book your first lesson.

    FAQ

    What is the role of a residential street driving lesson?

    A residential street driving lesson builds the core skills that a car park simply cannot develop, including junction awareness, hazard perception, speed management, and correct signalling in a real road environment.

    When should a learner move from car park to residential streets?

    Once a learner can move off smoothly, steer confidently, and stop safely, they are ready for quiet residential streets. This transition usually happens within the first two to four lessons.

    How do residential lessons help with the driving test?

    Residential street practice reduces test anxiety by building familiarity with real road conditions, improving decision-making at junctions, and reinforcing the mirror, signal, and manoeuvre routine that examiners assess.

    Can parents teach residential street driving effectively?

    Parents can be very helpful for building hours and familiarity, but certified instructors provide unbiased feedback and structured progression that parental supervision alone rarely achieves. A combination of both tends to produce the best results.

    How many residential street lessons does a learner typically need?

    There is no fixed number, but most learners benefit from spending a significant portion of their total training hours on residential roads before progressing to busier routes. Quality of practice matters more than quantity of hours.

  • How to Avoid Stalling a Manual Car: A Learner’s Guide to Smooth Starts in 2026

    What if the silence of a stalled engine isn’t a sign that you’re a bad driver, but simply a case of miscommunication between you and your car? You know that sinking feeling when the light turns green and the car jolts to a halt while a queue of traffic grows behind you. It’s frustrating and embarrassing, especially when you’re worried about holding up others or failing your test. Understanding how to avoid stalling a manual car is about more than just memorizing foot movements; it’s about listening to the vehicle’s sensory feedback.

    We’re here to help you turn that anxiety into calm, professional control. In this guide, you’ll master the art of clutch control and learn exactly how to recover with confidence if your engine cuts out. We’ll walk you through the “biting point” secret, show you how to handle steep hills without rolling, and explain the best ways to prepare for your practical test under the latest 2026 standards. You’ll soon have the skills to move off smoothly every time, whether you’re at a busy roundabout or a quiet junction.

    Key Takeaways

    • Understand the simple mechanics of engine resistance to learn exactly how to avoid stalling a manual car with every start.
    • Master the biting point by recognizing sensory cues like the engine’s changing pitch and the subtle movement of the car’s bonnet.
    • Build the skills to handle high-pressure situations, such as steep hills and busy roundabouts, using reliable handbrake techniques.
    • Learn a calm, five-step recovery routine that helps you safely restart and move off quickly if your engine ever cuts out.
    • See why personalized, patient instruction is the most effective way to build long-term confidence and eliminate anxiety behind the wheel.

    What is Stalling and Why Does it Happen to Every Learner?

    Stalling is a rite of passage for every learner driver. It feels like a loud, public declaration that you don’t know what you’re doing, but that isn’t true at all. In reality, stalling is simply a physical reaction to a lack of balance. An internal combustion engine is a machine that needs to keep spinning to stay alive. If the rotation speed drops too low because the wheels are providing too much resistance, the engine simply gives up. Learning how to avoid stalling a manual car starts with understanding this delicate relationship between power and resistance.

    Think of stalling as a built-in safety feature. If the engine didn’t cut out when things went wrong, the immense pressure could damage your manual transmission or snap expensive internal components. It’s the car’s way of protecting itself. Even the most experienced drivers stall on occasion. Perhaps they are wearing new shoes with thicker soles, or they are driving an unfamiliar vehicle for the first time. It isn’t a sign of a bad driver; it’s just a momentary lapse in sensory communication.

    The Mechanics of a Stall

    Inside your car, a heavy spinning disc called a flywheel is connected to the engine. When you press the clutch pedal down, you separate this disc from the rest of the car’s wheels. As you lift the pedal, a friction plate begins to touch that spinning flywheel. This is the biting point. If you bring these two parts together too quickly without enough engine power, the weight of the car acts like a giant brake. It stops the flywheel from spinning, which kills the engine instantly.

    Common Culprits: Clutch, Gas, and Gear Selection

    Most stalls happen because of three specific mistakes that every learner makes at least once:

    • The Spring-Back Trap: You find the biting point and the car starts to move, but you release the clutch pedal too quickly. You must hold the clutch steady for a second or two to let the car gain momentum.
    • Under-Accelerating: Your engine needs help to move 1.5 tonnes of metal. If you don’t give it enough gas (revs) as you lift the clutch, the resistance will win the battle every time.
    • The 3rd Gear Mistake: Trying to move off in the wrong gear is a guaranteed stall. Because 3rd gear is built for speed rather than raw power, it cannot provide the torque needed to get the car rolling from a standstill.

    By staying calm and focusing on these three areas, you’ll quickly discover how to avoid stalling a manual car and begin to feel the rhythm of the engine. It’s all about patience and practice.

    Mastering the Biting Point: The Secret to Smooth Starts

    Mastering the biting point is the single most important skill you’ll develop as a new driver. It’s the bridge between a stationary car and a moving one. Instead of guessing where that point is, you can learn to recognize the car’s natural signals. Learning how to avoid stalling a manual car is much easier when you stop treating the pedals like switches and start treating them like a conversation. Your car tells you exactly when it’s ready to move; you just need to know what to look, listen, and feel for.

    There are three primary sensory cues that indicate you’ve reached the biting point. First is the “Dip.” As the clutch plates begin to meet, you’ll see the front of the car slightly rise or the bonnet dip as the engine takes the strain. Second is the “Hum.” The engine’s pitch will change, becoming slightly deeper or lower as it works against the weight of the car. Finally, there’s the “Vibration.” You’ll feel a gentle shudder through the clutch pedal under your left foot. Preparation is key when Dealing with High-Pressure Stalling Scenarios, and these sensory cues provide the data you need to stay in control.

    The “Pause” technique is the secret weapon for smooth starts. Many learners make the mistake of lifting their foot all the way up as soon as the car begins to crawl. This often leads to a sudden jolt and a stall. Instead, when you feel the biting point, hold your foot perfectly still for two seconds. This gives the engine time to synchronize with the wheels. Once the car is moving at a walking pace, you can then release the rest of the pedal slowly and smoothly.

    Finding the Biting Point in a Modern VW

    Modern diesel and petrol engines, such as those found in Pass4you’s tuition vehicles, are designed to be forgiving. They provide clear feedback through the rev counter (RPM). You’ll notice the needle dip slightly when you hit the sweet spot. Every car is different; some have a “high” biting point near the top of the pedal’s travel, while others are “low.” Practicing in a consistent, modern vehicle helps you calibrate your senses quickly.

    The ‘Feet in Harmony’ Drill

    Think of your feet like a see-saw. As one goes down, the other comes up. To build muscle memory, try the “Car Park Crawl.” In a flat, quiet area, try to move the car using only the clutch, without touching the gas pedal at all. This forces you to find the biting point purely by feel. Wearing thin-soled shoes can also make a massive difference, as they allow you to “feel” the vibrations more accurately. If you find yourself struggling with foot coordination, taking professional driving lessons can help you refine this balance in a supportive environment.

    By focusing on these physical cues, you’ll soon find that how to avoid stalling a manual car becomes second nature. It’s about building a partnership with the machine rather than fighting against it.

    How to Avoid Stalling a Manual Car: A Learner’s Guide to Smooth Starts in 2026

    Dealing with High-Pressure Stalling Scenarios

    High-pressure environments like the Milton Keynes grid system can feel intimidating for any learner. Roads such as the H6 Childs Way or V8 Marlborough Street are famous for their fast-paced roundabouts and constant junctions. The pressure of a busy road often causes learners to rush their footwork, which is why so many people search for how to avoid stalling a manual car in these specific moments. When you feel rushed, you lose the sensory connection with the biting point that we explored earlier. Slowing down your mind is the first step to speeding up your progress.

    The “Psychology of the Honk” is a hurdle every new driver must clear. If an impatient driver behind you sounds their horn, it’s easy to panic. Remember that the honk is just noise; it doesn’t change the mechanics of your car. Take a deep breath. Your priority is to secure the vehicle and restart safely. Rushing to please a stranger usually leads to a second stall, which only increases the stress. Stay in your bubble and focus on your controls.

    It’s also a common myth that stalling means an instant fail on your big day. On your practical driving test, the examiner is looking for how you handle the situation. If you stall but recover quickly, safely, and without rolling back, it might only result in a minor fault. Demonstrating a calm recovery shows that you’re a responsible and capable driver who can manage mistakes under pressure.

    Mastering the Hill Start Without Rolling Back

    The handbrake is a tool for success, not a sign of weakness. To start on a hill, apply the gas and lift the clutch until you hear a low “groan” from the engine. This is the car telling you it’s ready to climb. Once you have that biting point, release the handbrake and hold your feet perfectly still. Don’t “ride the clutch” by keeping it at the biting point for too long while moving, as this causes unnecessary wear. Simply hold it until the car has enough momentum to fully release.

    Junction Anxiety: Moving Off Under Pressure

    Preparation is the best cure for junction anxiety. When you’re waiting for a gap at a busy MK roundabout, get the car ready early. Find your biting point while you’re still waiting. This “Look-Tell-Do” routine ensures that when the gap appears, you only need to release the handbrake and go. Rushing is the number one cause of stalling at junctions. By preparing your feet ahead of time, you remove the need for speed and replace it with precision. This is the most reliable way to understand how to avoid stalling a manual car when the traffic is heavy.

    A 5-Step Recovery Plan: What to Do When You Stall

    Even when you’ve studied exactly how to avoid stalling a manual car, the engine might still cut out during a moment of distraction. It happens to everyone. The difference between a flustered learner and a confident driver is the recovery. Instead of rushing to restart while the car is still rolling, you need a structured plan to regain control. This five-step routine ensures you stay safe and keep your composure, even in the middle of a busy junction.

    • Step 1: Secure the vehicle. Immediately pull the handbrake up and put both feet down (clutch and brake). This stops the car from rolling and tells your brain that the situation is under control.
    • Step 2: Reset the controls. Keep the clutch pedal down and move the gear lever into neutral. If you’re very quick, you can stay in first gear, but neutral is safer for a full reset.
    • Step 3: Restart the engine. Turn the key or press the “Start” button. On many modern cars, you must have the clutch fully depressed for the engine to fire up.
    • Step 4: The 360-degree observation. This is the most important step. Before you move, check all your mirrors and your blind spots. The road situation may have changed while you were restarting.
    • Step 5: Breathe and reset. Take three seconds to settle your nerves. Find your biting point using the sensory cues we discussed earlier, and move off when it’s safe.

    Modern Car Features: Auto-Restart and Electronic Handbrakes

    Many cars in 2026 come equipped with “Stop-Start” technology. In these vehicles, if you stall, the engine might automatically restart the moment you push the clutch pedal back to the floor. You don’t even need to turn the key. If your car has an electronic handbrake, it might engage automatically the moment the engine dies. Always check the dashboard light to see if it’s on. Some cars also have a “Hold” function that keeps the brakes applied until you find the biting point, which is a fantastic aid for preventing roll-backs during a recovery.

    Recovering During the Driving Test

    During your practical test, the examiner isn’t looking for perfection; they’re looking for safety. Stalling isn’t an automatic fail. However, a panicked restart without looking around is a serious fault. If you stall, stay calm. You can even use a “verbal reset” by saying something like, “Oops, let me just reset and check my surroundings.” This tells the examiner you’re in control of your emotions. By taking that extra second to perform a 360-degree check, you prove that you’re a responsible driver who prioritizes safety over speed. If you want to practice these recovery steps in a supportive environment, book your driving lessons with our patient team today.

    Mastering this recovery plan is just as important as learning how to avoid stalling a manual car in the first place. It gives you the “safety net” you need to drive with true confidence.

    Building Confidence with Patient Instruction in Milton Keynes

    Learning how to avoid stalling a manual car is much easier when you have an expert mentor by your side. While practicing with friends or family can be helpful, professional driving instructors are the fastest way to cure persistent stalling issues. Experts can identify the tiny errors in your footwork or timing that you might not even notice yourself. At Pass4you, we’ve refined our teaching methods to prioritize calm, patient coaching that completely eliminates “clutch fear” from the very first lesson.

    Our impressive 83.33% first-time pass rate is built on a simple, effective philosophy: you must master the basics before moving into complex traffic. We use modern VW tuition vehicles because they are designed to be intuitive and forgiving. These cars provide clear sensory feedback, making it much easier to understand how to avoid stalling a manual car while you’re still building your confidence. Instead of fighting with an old, heavy clutch, you can focus on the rhythm of the engine and the road ahead.

    Personalised Lessons for Anxious Learners

    We believe in moving at your own pace. We won’t rush you into busy Milton Keynes traffic or onto fast grid roads until you feel completely ready. This supportive approach helps you build a solid foundation of muscle memory without the stress of holding up other drivers. We also conduct mock tests in the exact areas of Milton Keynes where you’ll take your practical exam. By practicing your recovery routine in these high-pressure spots, you’ll feel prepared to book driving test dates with total peace of mind.

    Your Journey to a Full License Starts Here

    Holding a manual license offers a level of freedom that remains incredibly valuable in 2026. It gives you the flexibility to drive almost any vehicle and often leads to lower insurance costs. We’ve seen many learners who started as “serial stallers” transform into smooth, confident drivers through our specialized instruction. Don’t let the fear of a stalled engine hold you back from the opportunities that come with a full license. You have the ability to master this skill, and we’re here to support you every step of the way. You’ve got this, and your journey to independence starts today.

    Step Into the Driver’s Seat with Confidence

    Mastering your vehicle is about building a partnership with the machine through sensory feedback and steady practice. You’ve learned how to recognize the biting point through sight, sound, and touch; you also have a reliable five-step plan to recover if the engine ever cuts out. Understanding how to avoid stalling a manual car takes the fear out of junctions and roundabouts, allowing you to focus on the road ahead with a clear mind.

    Our team is dedicated to supporting you through every step of this process. We use modern Volkswagen tuition vehicles that are intuitive to drive, and our calm, patient instructors are experts at building your confidence. With an 83.33% first-time pass rate, we know exactly how to help you master the basics and achieve your goals. You don’t have to face the Milton Keynes grid system alone or feel overwhelmed by the learning process.

    Ready to master the manual? Book your first lesson with Pass4you in Milton Keynes today!

    Driving is a skill that opens up a world of freedom and opportunity. With the right guidance and a bit of patience, you’ll be moving off smoothly and safely in no time. We can’t wait to see you succeed on the road.

    Frequently Asked Questions

    Is stalling a manual car bad for the engine or gearbox?

    Stalling your car occasionally won’t cause any lasting damage to the engine or gearbox. It’s actually a safety measure that cuts power to prevent internal components from snapping under too much resistance. While frequent stalling over a long period can put extra strain on the battery and starter motor, it’s a normal part of the learning process. You don’t need to worry about breaking the vehicle while you practice your starts.

    Will I fail my driving test if I stall the car?

    Stalling is not an automatic fail on your practical driving test. It only becomes a serious issue if it happens in a dangerous place or if you fail to perform safety checks before moving off again. If you handle the situation calmly and follow the recovery steps we discussed earlier, the examiner will likely record it as a minor fault. They want to see that you can stay composed and keep the road safe.

    Why does my car stall when I’m braking to a stop?

    Your car stalls while braking because the engine speed has dropped too low to stay running. As the wheels slow down, they pull the engine’s rotation down with them. To prevent this, you should press the clutch pedal down once your speed reaches about 10 or 15 mph. This separates the engine from the wheels and allows it to idle peacefully while the car comes to a stop. It’s a common mistake for new learners.

    Can you stall a modern automatic car?

    Stalling a modern automatic car is almost impossible under normal driving conditions. These vehicles use a torque converter or a computer-controlled clutch to manage the connection between the engine and the wheels automatically. If an automatic car does stall, it’s usually a sign of a mechanical fault, such as a failing sensor or a problem with the fuel supply. It isn’t something a driver can cause through poor footwork or timing errors.

    How many times can I stall in a driving test before failing?

    There is no specific limit on how many times you can stall, but consistency and safety are the main factors. One or two stalls handled safely usually result in minor faults. However, if you stall repeatedly in the same type of situation, the examiner may decide you lack control of the vehicle. When learning how to avoid stalling a manual car, the focus should always be on safe, controlled recovery rather than counting your mistakes.

    Why is my car stalling even when the clutch is fully down?

    A car that stalls with the clutch fully down usually has an underlying mechanical problem. Driver error typically causes stalls when the clutch is at the biting point, but a stall with the pedal down suggests the engine cannot maintain its idle. This could be due to a blocked fuel filter, faulty spark plugs, or an issue with the battery. It’s best to have a qualified mechanic investigate the vehicle to ensure it’s safe.

    Is it easier to stall a petrol car compared to a diesel?

    Petrol cars are generally easier to stall than diesels because they produce less power at low engine speeds. Diesel engines have more torque, which helps them pull away even with very little gas. When practicing how to avoid stalling a manual car with a petrol engine, you’ll find that giving the car a few more revs at the biting point makes the start much smoother. This extra power helps the engine overcome the car’s weight.

    What should I do if the car stalls and won’t restart immediately?

    If your car won’t restart immediately, ensure the gear lever is in neutral and the clutch pedal is pressed firmly to the floor. Many modern cars have a safety switch that prevents the engine from firing unless the clutch is fully depressed. If the engine still refuses to start after a few attempts, turn on your hazard lights to alert other drivers. Stay calm and call for professional assistance if the vehicle remains unresponsive.

  • What is the independent driving test?

    What is the independent driving test?

    Most learner drivers walk into their practical test thinking the independent driving section is a sat nav challenge. It is not. The independent driving test is a 20-minute assessment of how safely you make decisions when no one is guiding your every move. Navigation is just the backdrop. What examiners are actually watching is your observation, your speed control, your lane discipline, and how calmly you respond when things do not go to plan. This article covers exactly what the section involves, what you are being marked on, and how to prepare for it properly.

    Table of Contents

    Key takeaways

    Point Details
    Navigation is not the focus Examiners assess safe driving behaviour, not whether you follow every direction perfectly.
    The section lasts 20 minutes Independent driving accounts for nearly half of your total practical test time.
    Wrong turns are not automatic failures The sat nav recalculates and testing continues, as long as your driving stays safe.
    Sat nav is used in 4 out of 5 tests The examiner sets up the device; you cannot use your own.
    Preparation requires real practice Practise following audio instructions and traffic signs while maintaining your full driving routine.

    What is the independent driving test section?

    The independent driving portion of your practical test was extended from 10 to 20 minutes in 2017, and it now accounts for nearly half of your total test time. That alone tells you how seriously the DVSA takes this section. It is not a bolt-on extra. It is a core part of the assessment.

    During this section, the examiner stops giving you turn-by-turn instructions. Instead, you follow either a sat nav or road signs, depending on which method your test uses. The critical thing to understand is that the section is called “independent driving” for a reason. It is designed to reflect real-world conditions, where you are making your own driving decisions without a commentary from a passenger.

    Here is a breakdown of the key format details:

    Feature Detail
    Duration Approximately 20 minutes
    Navigation method Sat nav (4 in 5 tests) or road signs (1 in 5 tests)
    Sat nav device Typically a TomTom Start 52, set up by the examiner
    Can you use your own device? No
    What if you make a wrong turn? The sat nav recalculates; testing continues

    A few things trip learners up before they even start. The examiner provides and sets up the sat nav before the section begins. You do not need to mount it, programme it, or touch it. Your job is simply to drive, listen, and react safely. The device is positioned to remain within your eyeline without forcing you to look away from the road.

    The other common misconception is that following directions perfectly is the goal. It is not. Recent changes to the test have also introduced routes through higher-risk areas to better reflect the kind of driving you will do once you pass. The routes are intentionally more demanding than they used to be.

    What examiners actually assess

    Understanding the independent driving assessment properly means separating navigation from driving. The examiner is not scoring you on whether you reach the correct roundabout exit. They are watching how you handle the road while you are dealing with the additional mental load of following directions.

    The core focus is safe driving standards: observation at junctions, appropriate speed for conditions, correct lane positioning, and hazard awareness. These are the same things assessed throughout your entire test. The independent section simply tests them under slightly more demanding conditions, because your attention is split.

    Specifically, examiners are looking at:

    • Observation. Are you checking mirrors before changing speed or direction, even when you are thinking about the next instruction?
    • Speed management. Are you maintaining appropriate speed, or slowing down unnecessarily because you are uncertain about the route?
    • Lane discipline. Are you positioning yourself correctly on the approach to junctions, or drifting because you are distracted?
    • Hazard responses. Are you reacting to pedestrians, cyclists, and other vehicles as you normally would?
    • Composure. Are you staying calm and in control, or becoming flustered when directions feel unclear?

    What happens when you take a wrong turn? Nothing catastrophic. A wrong turn does not cause an automatic fault. The sat nav recalculates and the test continues exactly as before. The examiner will not intervene unless your driving becomes unsafe. So if you miss a turning, do not brake sharply or make an erratic correction. Signal, check mirrors, and deal with it calmly. That composed response is actually what examiners want to see.

    Pro Tip: If the sat nav instruction conflicts with a road sign or traffic condition, always follow the road. Traffic lights, give-way lines, and lane markings take priority over any sat nav instruction. Examiners know this happens and will not penalise you for following the road correctly.

    Driver glances at sat nav after missed turn

    How to prepare for independent driving

    Preparation for the independent driving section is not just about getting comfortable with a sat nav. It is about developing the ability to drive to a high standard while managing extra information at the same time. That is a skill, and it takes deliberate practice.

    Here are the steps that make a genuine difference:

    1. Practise with a sat nav in lessons. Ask your instructor to use a sat nav during lessons so you get used to processing audio instructions while driving. The goal is to hear the instruction, acknowledge it, and continue driving without any change in your behaviour.

    2. Build your mirror-signal-manoeuvre habit until it is automatic. When your MSM routine is second nature, it does not require conscious effort. That frees up mental capacity to process navigation at the same time.

    3. Follow road signs on familiar and unfamiliar routes. One in five tests uses road sign navigation rather than a sat nav. Practise identifying and responding to direction signs during lessons, particularly on routes you do not know well.

    4. Practise recovering from wrong turns calmly. Have your instructor deliberately give you a direction that leads to a wrong turn, then practise correcting it safely. The recovery matters more than the mistake.

    5. Work towards Level 4 independent driving. Your instructor should be logging your progress on Skill 27, the DVSA’s readiness metric for independent driving. Level 4 means smooth, safe driving with good observation and calm responses to errors. Do not book your test until you are consistently reaching that standard.

    Pro Tip: Use the audio instructions from the sat nav rather than glancing at the screen. A brief visual check to confirm an upcoming junction is fine, but the audio cue should be your primary source of information. This keeps your eyes on the road where they belong.

    Common challenges and how to overcome them

    Even well-prepared learners hit specific stumbling blocks during the independent section. Knowing what those are in advance takes away a lot of their power.

    • Test nerves amplified by navigation pressure. Many learners feel more anxious during the independent section because they fear making a navigation error. The antidote is to remind yourself, before the test and during it, that wrong turns do not fail you. Safe driving keeps you on track for a pass.

    • Over-focusing on the sat nav screen. This is one of the most common errors. When learners stare at the screen trying to anticipate the route, they stop scanning the road properly. Rely on the audio. Glance at the screen briefly at safe moments, not while approaching junctions.

    • Rushing a turn after a late instruction. If the sat nav tells you to turn and you are already at the junction, do not force it. Missing the turn is far safer than cutting across traffic. The examiner will guide you back on route and your test continues.

    • Losing composure after a mistake. One wrong turn can unravel a learner’s entire drive if they let it affect their confidence. Treat each mistake as a separate event. Correct it calmly, reset, and continue. Examiners are not looking for perfection. They are looking for safe, composed driving.

    • Underestimating the mental load. The real-world multitasking demands of independent driving catch some learners off guard. Build up to it gradually in lessons. Do not save independent driving practice for the final few lessons before your test.

    Sat nav vs. road sign navigation

    Understanding both navigation methods helps you feel prepared regardless of which one your test uses.

    Feature Sat nav Road sign following
    How common is it? 4 out of 5 tests 1 in 5 tests
    How do you receive instructions? Audio and visual prompts from the device Verbal direction from examiner plus your own sign reading
    Can you ask for a repeat? No, but the device repeats automatically Yes, once per instruction
    What if you get lost? Sat nav recalculates automatically Examiner will assist if needed
    Key learner tip Trust the audio; avoid screen fixation Scan ahead for signs early; read them in good time

    Infographic comparing sat nav and road signs navigation

    The sat nav method catches learners out because it can feel passive. You might assume the device will always give you enough warning. In reality, instructions sometimes come later than you would like, particularly on fast roads. Practising with a sat nav in lessons, on routes that include dual carriageways and busy roundabouts, removes that surprise on test day.

    Road sign navigation asks more of your visual attention. You need to scan ahead actively, identify direction signs early, and process them quickly enough to position your vehicle correctly. The good news is that you can ask the examiner to repeat instructions once if you did not catch them clearly.

    My honest take on the independent section

    I have seen a lot of learners arrive at their test well prepared technically, only to let the independent section affect their confidence more than it should. The shift in mindset that makes the biggest difference is this: stop thinking about it as a navigation test and start thinking about it as a safe driving demonstration that happens to involve directions.

    In my experience, the learners who handle this section best are the ones who have genuinely internalised their MSM routine. When safe driving is a habit rather than a checklist, the extra cognitive load of following a sat nav does not throw them. The driving just continues.

    I have also seen the opposite. Learners with technically sound skills who fixate on the route, tense up at the first unexpected instruction, and then carry that tension into the rest of their drive. The wrong turn itself was never the problem. Their reaction to it was.

    My advice is to practise recoveries as deliberately as you practise any other skill. If your instructor has not yet simulated a wrong turn in a lesson, ask them to. Knowing from experience that you can correct a mistake calmly and continue driving well is far more reassuring than being told it will be fine.

    — Simon

    Ready to master the independent driving section?

    Knowing what the independent driving test involves is a strong start. The next step is getting the right practice behind you before test day arrives.

    https://pass4you.co.uk

    At Pass4you, our instructors build independent driving skills into lessons from an early stage, not just in the final few weeks before your test. We cover sat nav practice, sign-following routes, and calm recovery from errors, all on real local roads around Milton Keynes and Bletchley. Our learner driver courses are designed to get you to Level 4 independent driving with the confidence to match. If you want to progress faster, our intensive driving courses compress that preparation without cutting corners. Take a look at what Pass4you offers and give yourself the best possible chance of passing first time.

    FAQ

    What is the independent driving test section?

    The independent driving section is a 20-minute part of the practical driving test where you follow either a sat nav or road signs without instruction from the examiner. It assesses safe driving behaviour, not navigation accuracy.

    Does a wrong turn fail the independent driving test?

    No. A wrong turn does not cause an automatic fault. The sat nav recalculates and testing continues as normal, provided your driving remains safe.

    Can I use my own sat nav during the test?

    No. The examiner provides and sets up a sat nav device, typically a TomTom Start 52, before the independent section begins. You cannot use your own device.

    How do I prepare for independent driving?

    Practise following audio sat nav instructions during lessons while maintaining your full driving routine. Work with your instructor until you reach Level 4 readiness, which means smooth, safe driving with calm responses to any errors.

    What if my test uses road signs instead of a sat nav?

    One in five driving tests uses road sign navigation. You follow verbal directions from the examiner and read signs yourself. You can ask the examiner to repeat an instruction once if you missed it.

  • Mastering Clutch Control: 7 Essential Exercises for Learner Drivers in 2026

    Last week, a learner named James sat at a busy junction, his left leg trembling as he tried to find the biting point while traffic built up behind him. That surge of heat in your cheeks when the engine dies is a feeling almost every new driver knows. It’s stressful and embarrassing, but it doesn’t have to be your reality every time you get behind the wheel.

    We understand how frustrating it is when your foot won’t cooperate, especially when you’re dealing with a heavy clutch. Stalling isn’t a sign that you’re a bad driver; it’s just a sign that your muscle memory needs more training. To help you gain control, we’ve put together the most effective clutch control exercises for learner drivers to build your confidence and skill.

    This guide reveals the exact drills our instructors use to help students reach the 2026 national average pass rate of 52.2% and beyond. We will walk you through seven essential exercises, from “micro-movements” to mastering steep hills, so you can pass your test without a single clutch-related fault.

    Key Takeaways

    • Visualize the “handshake” between your engine and wheels to finally understand what the biting point actually feels like.
    • Master specific clutch control exercises for learner drivers that build muscle memory on flat ground before you tackle busier roads.
    • Gain the confidence to handle steep hills and junctions using the handbrake balance method to prevent rolling back.
    • Discover how to stop stalling by fixing common footwork mistakes that often cause frustration during the learning process.
    • Apply these professional drills to stay calm and controlled while managing the unique roundabouts and grid roads across Milton Keynes.

    The Mechanics of the Biting Point: Why It Feels So Tricky

    Understanding the biting point is the first hurdle for every new driver. Think of it as a “handshake” between the engine and the wheels. When the clutch pedal is pushed fully to the floor, the engine spins independently, and no power reaches the wheels. As you slowly lift your foot, you reach a specific zone where the engine’s power begins to flow into the gearbox. This is the biting point. There are three distinct stages to master: the floor (fully down), the bite (the connection), and the release (fully up). Most stalling happens because learners try to skip the middle stage. When you release the pedal too quickly, the engine can’t handle the sudden load and dies. It’s a common source of anxiety, but once you recognize the physical cues, you’ll feel much more in control.

    You’ll notice specific signs when you hit that sweet spot. The car’s nose might dip slightly, or the back of the car might feel like it’s squatting. The engine sound will drop in pitch, becoming a deeper, more strained growl. Most importantly, a gentle vibration will travel through the sole of your shoe. These signals are the car telling you it’s ready to move.

    The Science of the “Handshake”

    At its core, Clutch control principles are about managing friction. Inside your car, two spinning discs are trying to sync up. One is connected to the engine, and the other leads to the wheels. As you lift your left foot, these plates meet. They don’t just “click” together; they slide against each other until they match speeds. This friction creates a distinct “hum” or vibration. Recognizing this physical feedback is vital before you start specific clutch control exercises for learner drivers. You aren’t just moving a pedal; you’re managing a delicate mechanical connection. Staying calm and listening to the car helps you feel exactly when those plates have gripped enough to move the vehicle forward without a jerk.

    Why Your Left Foot Struggles (And How to Fix It)

    Your left leg usually only has one job: walking or standing. It isn’t used to the delicate, millimetre-perfect movements required for a smooth pull-away. The pedal also has a strong spring tension that wants to push your foot back up. This resistance can make your leg feel heavy, shaky, or fatigued after a long lesson. Don’t worry if you stall during your first few attempts. Stalling is actually a helpful part of the calibration process. It teaches your brain exactly where that “connection” ends. With patience and the right clutch control exercises for learner drivers, your muscles will eventually memorize the pressure needed to hold the bite steady. It’s a physical skill that develops with time, much like learning to ride a bike or play an instrument. You’re simply training your leg to handle a new kind of pressure.

    Foundational Clutch Control Exercises for Beginners

    To begin your practice, find a flat and quiet area well away from the bustling Milton Keynes traffic. A deserted car park or a quiet cul-de-sac is perfect. This environment removes the pressure of other drivers, allowing you to focus entirely on your feet. When you feel safe and unhurried, you can begin the physical work of building muscle memory. These initial clutch control exercises for learner drivers are designed to be repeatable until the movement feels like second nature.

    Exercise 1 is the “No-Gas” Pull Away. This drill helps you understand the raw power of the engine without the distraction of the accelerator. In a diesel car, you might find the car moves quite eagerly due to higher torque. Petrol cars are more sensitive and require a lighter, more patient touch. By slowly lifting the clutch without touching the accelerator, you’ll feel the car begin to roll. Understanding how manual transmissions work helps here, as you are seeing the engine’s idle speed take over the work of moving the vehicle.

    Exercise 2 is the Paper-Thin Lift. Once you find the biting point, try to lift your foot by just one millimetre at a time. This teaches you the extreme precision needed for tight spaces. Exercise 3 is the Steady Hold. Your goal is to keep the car at a slow crawl for at least 10 metres. The secret here is “freezing” your foot. Once the car moves, don’t lift any further. If you keep lifting, the car will gain too much speed or stall. If you feel you need more personalized guidance to perfect these drills, booking driving lessons with an experienced instructor can help refine these movements quickly.

    Mastering the Heel Pivot Technique

    Many learners wonder whether to keep their heel on the floor or lift their whole leg. If the biting point is low, keeping your heel down provides better stability and reduces leg fatigue. However, for cars with a higher bite, you may need to “float” your heel to avoid straining your ankle at an awkward angle. The pivot point is the stable anchor where your heel meets the floor to act as a fulcrum for the pedal’s arc. Using this anchor allows for much smoother movements than trying to hover your entire leg in the air.

    The “Creeping Crawl” Drill

    This involves moving the car at a snail’s pace, often slower than a walking speed. You manage the speed entirely with the clutch; if the car goes too fast, dip the clutch slightly. If it slows too much, lift it a millimetre. Mastering this is the secret to success during driving lessons in Milton Keynes, especially when navigating the city’s complex roundabouts and stop-start grid roads. It gives you the time to look for gaps in traffic without the car surging forward unexpectedly.

    Mastering Clutch Control: 7 Essential Exercises for Learner Drivers in 2026

    Intermediate Drills: Mastering Hills and Junctions

    Moving your practice from flat car parks to slight inclines is a significant milestone. It’s the moment you stop thinking about the pedal and start feeling the car’s weight. These intermediate clutch control exercises for learner drivers focus on balancing power against gravity. You’ll need more engine power here than you did on flat ground. We recommend “setting the gas” by gently pressing the accelerator until the rev counter sits between 1500 and 2000 RPM. This creates a stable foundation of power, ensuring the engine doesn’t struggle or stall when you reach the biting point.

    Exercise 4 is the Handbrake Balance. While the handbrake is firmly on, find your biting point and add your gas. You’ll feel the car strain against the cable, almost like a dog pulling on a lead. This “tug” is your signal that the car is ready to climb. Exercise 5 is the “Feet Swap.” This drill involves moving your right foot quickly from the brake to the gas pedal while holding the clutch perfectly still at the bite. It’s a quick, decisive movement that prevents the car from rolling back in traffic. These clutch control exercises for learner drivers turn a stressful hill start into a routine part of your driving day.

    Conquering the Dreaded Hill Start

    To master hills, try the 3-second hold drill. Find a safe incline and bring the car to a stop. Find your biting point and hold the car perfectly still for exactly three seconds before moving off or reapplying the brake. You’ll feel that distinct “tug” as the nose of the car lifts. Be careful not to hold this position for too long. Holding the car on the bite for extended periods can cause the friction plates to overheat; this is commonly known as “burning the clutch.” Use this drill sparingly to build your confidence without putting unnecessary wear on the vehicle.

    Junction Readiness: The “Slow-Look-Go” Exercise

    Approaching junctions requires a delicate “Slow-Look-Go” technique. Practice approaching a line at a steady 2mph by using your clutch to regulate the speed. This gives you time to observe traffic without coming to a complete, jerky stop. As you scan for a gap, keep your foot at the biting point so you can move off instantly when it’s safe. This level of precision is essential for mastering the dual carriageway, where joining fast-moving traffic requires a confident and smooth pull-away every time.

    Troubleshooting: Why You Are Still Stalling

    Stalling is a rite of passage for almost every new driver. While it feels like a disaster in the moment, it’s actually just your car giving you feedback. If you experience a stall during your practical driving test, remember that it isn’t an automatic fail. The examiner is looking for a calm, safe recovery. Secure the car with the handbrake, restart the engine, and perform your observations again. Even with the national average pass rate sitting at 52.2% in 2026, many successful students have stalled once or twice during their exam. The difference between passing and failing often comes down to how you handle the pressure afterward.

    There are three primary reasons why learners continue to stall even after practicing clutch control exercises for learner drivers. First, many students release the pedal too quickly the moment the car begins to roll. You must keep your foot still for a moment to let the car gain momentum. Second, a lack of “gas” on inclines will starve the engine of the power it needs to move the vehicle’s weight. Finally, panic is a major factor. When a driver behind you honks, the natural instinct is to rush. This usually leads to a “panic-release,” where your foot jumps off the pedal and the engine dies instantly. Stay focused on your own feet; the driver behind can wait a few extra seconds.

    The “Six-Inch Rule” for Smoothness

    A common mistake is thinking the job is done once the car moves. We teach our students the “Six-Inch Rule.” This means you should hold your left foot perfectly still at the biting point until the car has travelled at least six inches. This allows the friction plates to fully sync without a sudden jolt. “The secret to a smooth pull-away isn’t finding the bite, it’s what you do in the second after the car moves.” That final inch of pedal travel is the most sensitive; treat it with the most care. If you want to eliminate these jerky starts for good, our team can provide expert driving lessons tailored to your specific needs.

    Footwear and Seat Position

    Your physical setup in the car dictates how much “feel” you have through the pedal. Chunky boots with thick soles or high heels can mask the subtle vibrations of the biting point. We recommend wearing thin-soled trainers to maximize your sensitivity. Your seat position is equally vital. If you’re sitting too far back, you’ll end up “toe-stretching” to reach the floor. This makes your leg muscles tense and leads to shaky, jerky control. Adjust your seat so that your knee remains slightly bent even when the clutch is pushed fully to the floor. This posture gives you the range of motion needed for the millimetre-perfect adjustments required in clutch control exercises for learner drivers.

    Putting It Into Practice on Milton Keynes Roads

    Milton Keynes presents a unique challenge for new drivers. With its distinctive H and V grid roads and a roundabout at almost every intersection, smooth footwork isn’t just a bonus; it’s a necessity. Mastering clutch control exercises for learner drivers is your secret weapon for navigating this city with ease. When you can hold the bite while scanning for a gap on a busy V6 or H8 road, you’ll feel much more capable. The stop-start nature of MK traffic during rush hour can be exhausting for your left leg. However, instructors at Pass4you Driving School use modern Volkswagen vehicles specifically chosen for their forgiving biting points and responsive pedals. These cars often feature electronic assistance that makes the learning process significantly more comfortable, allowing you to focus on the road ahead rather than struggling with a stubborn, heavy gearbox.

    Roundabout Confidence: The “Pause and Peek”

    Mini-roundabouts in Milton Keynes require quick thinking and even quicker feet. We teach our students the “Pause and Peek” method. This involves using the clutch to slow the car to a crawl as you approach the line. While gear 2 is common for larger junctions, using gear 1 and precise clutch control is often safer for MK’s tighter mini-roundabouts. It gives you the time to observe and react without the car feeling like it’s running away from you. This technique is especially helpful when you’re preparing to merge onto a fast-moving dual carriageway. A smooth, confident pull-away ensures you join the flow of traffic safely without causing other drivers to brake.

    Why Professional Instruction Saves Time and Money

    Trying to learn these skills through informal practice can be a slow and frustrating process. It often leads to bad habits that are hard to break later on. Finding a qualified driving instructor near me ensures you receive structured, professional guidance from day one. At Pass4you Driving School, our focus on high-precision techniques has led to an 83.33% first-time pass rate. This is a powerful metric when compared to the 2026 national average of 52.2%. We consistently see that one hour of professional instruction is more valuable than five hours of struggling alone. It’s an investment that saves you time, reduces your long-term costs, and builds the safety-first mindset required for a lifetime of driving.

    Building rock-solid confidence in your left foot is the fastest way to pass your test and enjoy the freedom of the road. If you’re ready to stop stalling and start driving, our patient mentors are here to help. Book your driving lessons today with Pass4you Driving School and take the first step toward a successful, stress-free test day.

    Ready to Take Control of Your Driving Future?

    Mastering the biting point is more than just a technical requirement for your test; it’s the key to feeling relaxed and safe every time you get behind the wheel. By consistently practicing these clutch control exercises for learner drivers, you’ve already taken a massive step toward eliminating stalling and building the muscle memory needed for those busy junctions. Every experienced driver once struggled with their left foot just like you. Patience and the right environment are all it takes to turn that initial anxiety into rock-solid confidence.

    We believe that learning should be a positive, supportive experience. The patience-first teaching style and modern VW tuition vehicles at Pass4you Driving School are designed to help you succeed quickly and safely. With our impressive 83.33% first-time pass rate, you can trust that you’re in the most capable hands in the region. Don’t let the fear of stalling hold you back from the freedom of the road any longer. Master your clutch control with Milton Keynes’ top-rated instructors – Book your first lesson with Pass4you Driving School today!

    You have the potential to be a smooth, confident driver. We can’t wait to help you thrive and enjoy the opportunities that come with your new licence.

    Frequently Asked Questions

    How long does it take to master clutch control?

    It typically takes between five to ten hours of focused practice to stop thinking about your feet and start feeling the car naturally. Everyone learns at a different pace, so don’t feel discouraged if you need a little more time to build that muscle memory. Consistent practice during your lessons will soon make these movements feel like a natural reflex rather than a conscious effort.

    Is it easier to learn clutch control in a diesel car?

    Yes, diesel engines generally have more torque at low speeds, which makes the biting point more pronounced and harder to stall. This is why many instructors use diesel vehicles for initial clutch control exercises for learner drivers. Once you master the technique in a diesel, transitioning to a more sensitive petrol car becomes much easier because you already understand the physical sensations involved.

    What happens if I “ride the clutch” for too long?

    Riding the clutch means keeping the pedal partially depressed while driving, which causes the internal friction plates to slip and overheat. Over time, this leads to premature wear and a characteristic burning smell. It’s a habit that can result in costly mechanical repairs. Learning to rest your foot on the floor once you’ve changed gear or moved away will keep the car healthy and your control precise.

    Can I fail my driving test for stalling once?

    No, you won’t necessarily fail for a single stall as long as you recover safely and don’t create a hazard for other road users. The examiner looks for a calm response: securing the car, restarting the engine, and performing all necessary observations before moving off again. Stalling only becomes a serious fault if it happens repeatedly or in a dangerous situation, such as in the middle of a busy junction.

    Why does my left leg ache after a driving lesson?

    Your left leg is using muscles for fine motor control that aren’t typically used in daily life. Holding the clutch at the biting point requires you to fight against the pedal’s spring tension, which can lead to muscle fatigue. As you practice more clutch control exercises for learner drivers, your leg will become stronger and the movements will require less conscious effort, reducing that post-lesson ache.

    Should I wear specific shoes for my driving lessons?

    You should wear flat shoes with thin soles to maximize the feedback you get from the pedals. Thick-soled boots or high heels can make it very difficult to feel the subtle vibrations of the biting point. Lightweight trainers are usually the best choice for beginners. Having a dedicated pair of thin-soled shoes can help you stay consistent and build your confidence more quickly during your early lessons.

    How do I stop the car from rolling back on a hill?

    The most reliable way to prevent rolling back is to use your handbrake while you find the biting point. Keep the handbrake engaged until you feel the car “tug” forward and see the nose dip slightly. Once you’ve set the gas and found the bite, you can smoothly release the handbrake. This technique ensures the engine is already pulling the car forward before the brakes are released.

    Is clutch control different in an automatic car?

    Automatic cars do not have a clutch pedal, so the vehicle manages the internal connection between the engine and wheels for you. You only have to manage the accelerator and the brake. While this removes the risk of stalling, it means you have less direct control over the car’s slow-speed crawling. Many learners find automatics easier to drive in stop-start traffic, but they don’t offer the same mechanical engagement as a manual.

  • How to choose the right driving instructor

    How to choose the right driving instructor

    Finding the right person to teach you to drive is one of the most consequential decisions you will make as a learner. Choose wisely and you will build real confidence, develop safe habits, and pass your test without wasting time or money. Choose poorly and you could spend months feeling anxious, picking up bad technique, or stalling without progress. This guide cuts through the noise to help you choose the right driving instructor based on what actually matters: qualifications, teaching style, vehicle quality, and genuine success indicators.

    Table of Contents

    Key takeaways

    Point Details
    Verify ADI status first Always confirm your instructor holds a green ADI badge before booking a course.
    Teaching style matters as much as credentials An instructor who adapts to your pace will build your confidence far faster than a technically qualified one who does not.
    Use trial lessons strategically A single trial lesson tells you more about compatibility than any number of online profiles.
    Read reviews critically Look for consistent patterns across multiple genuine reviews, not just an overall star rating.
    Logistics affect progress Location, scheduling flexibility, and backup cover are practical factors that directly impact your learning momentum.

    How to choose the right driving instructor

    Before you book a single lesson, you need to understand the difference between two types of instructors operating on UK roads. An Approved Driving Instructor (ADI) has passed all three parts of the DVSA qualifying examination and is registered on the official ADI register. They display a green badge in their windscreen. A Potential Driving Instructor (PDI) is still in training and displays a pink badge. PDIs are permitted to charge for lessons only while holding a trainee licence, and their teaching experience is understandably limited.

    Accredited instructors trained via recognised programmes provide up-to-date knowledge of road laws, safe driving techniques, and adapt lessons to individual learner needs. That combination is something an informal arrangement with a family member simply cannot replicate. Teaching informally can foster bad habits and lacks the structured progression that professional instruction provides.

    Key things to check when verifying driving instructor qualifications:

    • ADI registration: Ask for their ADI number and cross-reference it on the official DVSA register.
    • Badge colour: Green means fully qualified. Pink means trainee. Know which you are getting.
    • Check sheet grade: ADIs are periodically assessed by DVSA examiners and awarded grades. A Grade A or B instructor has demonstrated strong teaching ability.
    • Insurance: Fully qualified ADIs must carry appropriate professional indemnity and motor insurance. Ask directly if you are unsure.

    Pro Tip: Ask your instructor when they last completed continuing professional development. The best instructors treat learning as ongoing, not something that ends once they pass their qualifying exam.

    Teaching style and your learning preferences

    Infographic of five steps to choose instructor

    The right instructor goes beyond credentials. The personality and teaching approach of your instructor can determine whether you enjoy lessons or dread them, and ultimately whether you pass.

    Instructors broadly fall into a few different camps. Some are firm and structured, favouring a precise step-by-step approach where everything is explained before you attempt it. Others are more relaxed and conversational, building rapport while guiding you to discover technique through experience. Some rely heavily on verbal instruction while others use demonstration and visual cues. None of these approaches is objectively superior. What matters is how well the style matches how you learn.

    Consider these questions before and during your first lesson:

    • Do you need someone calm and patient, or do you respond better to a more direct style?
    • Do you prefer detailed explanations upfront, or do you learn better by doing first and reflecting after?
    • How do you respond to criticism? Do you need encouragement built into feedback, or are you comfortable with blunt correction?

    Instructor adaptability to learner preferences strongly influences confidence and skill acquisition. A good instructor notices when something is not working and changes their approach without being asked. A less experienced or less engaged instructor keeps repeating the same explanation in the same way, even when you clearly are not getting it.

    There is also a technique worth knowing about for nervous learners. Narrating actions aloud during lessons, such as saying “mirror, signal, manoeuvre” as you do it, helps manage anxiety and builds confidence more effectively. If an instructor actively encourages this kind of technique, that is a strong sign they are thinking about your learning experience, not just ticking off topics.

    Instructor gently adapts teaching for nervous learner

    Pro Tip: Book a trial lesson with two different instructors before committing to a block booking. The contrast alone will tell you a great deal about what suits you.

    Manual vs automatic: matching vehicle to your goals

    This is a decision that affects both which instructors you can use and what your licence allows you to do once you pass.

    Factor Manual Automatic
    Licence flexibility Pass in manual and you can drive both Pass in automatic and you are restricted to automatics only
    Learning curve Steeper initially due to clutch and gear changes Easier to pick up, faster early progress
    Instructor availability More instructors teach in manual vehicles Fewer automatic instructors, but availability is growing
    Cost Generally similar, though varies by school Can be slightly higher due to fewer vehicles in the fleet
    Best suited for Learners who want maximum flexibility Learners with coordination challenges or those who just want to pass quickly

    The condition of the lesson car also matters considerably. It should be modern, clean, and fitted with dual controls so the instructor can intervene safely if needed. A car that is poorly maintained, cramped, or lacks dual controls is a warning sign about how seriously the instructor takes their professional standards.

    When searching for local driving instructors, confirm explicitly that they teach in the transmission type you have chosen and that their vehicle is appropriate for your needs. Do not assume.

    Reading reviews and pass rates properly

    Many learner drivers make the mistake of focusing purely on pass rate statistics when choosing a driving school. The reality is more nuanced. Official pass rates are not publicly available for individual instructors in the UK. Any instructor advertising a specific pass rate is relying on self-reported data, which is difficult to verify independently.

    That does not mean success indicators are useless. It means you need to know what to look for:

    • Verified review platforms: Look for reviews on Google, Trustpilot, or Yell where submissions require an account. These are harder to fabricate than testimonials on an instructor’s own website.
    • Patterns over scores: A high star rating with a handful of reviews means less than a solid rating with fifty reviews showing consistent themes. Look for repeated mentions of patience, clear explanations, and calm behaviour under pressure.
    • Specific detail: Learner reviews and testimonials provide the best insight into an instructor’s reliability, patience, and teaching success. Reviews that say “passed first time, very patient” are more useful than a vague “great instructor.”
    • Red flags: Be cautious of instructors who advertise suspiciously high pass rates without any context. An 83% first-time pass rate at a specific test centre, publicly stated and backed by reviews, is credible. A claim of “98% first-time passes” with no supporting detail is not.
    • Response to negative reviews: How an instructor or school responds to criticism tells you a great deal about their professionalism.

    Practical steps to find and trial instructors

    Knowing what to look for is one thing. Actually finding good candidates is another. Here is a practical process that removes the guesswork.

    1. Start with recommendations. Ask friends, family, or colleagues who have recently passed their test. First-hand experience from someone you trust carries more weight than any marketing material.
    2. Check the DVSA register. The official ADI register lets you find approved instructors in your area and confirm their status. Use it as your baseline, not your only source.
    3. Read reviews on independent platforms. Cross-reference what you find on Google and Trustpilot. Look for the patterns described above, not just the overall score.
    4. Contact three to four instructors. Ask about their teaching approach, lesson vehicle, availability in your area, and what happens if they are unavailable due to illness or holiday. Backup cover is something driving schools can offer that a sole trader cannot, and it matters for maintaining your learning momentum.
    5. Book trial lessons. Do not commit to a block of ten lessons without first experiencing at least one lesson with that instructor. Most reputable instructors offer this.
    6. Evaluate the lesson honestly. Did the instructor listen to you? Did they adapt when something was not working? Was the car clean and in good condition? Did you feel safe and respected?

    Pro Tip: When you contact an instructor for the first time, notice how quickly and clearly they respond. Communication style before lessons are booked often reflects how they will behave during them.

    A practical table for evaluating candidates:

    Criteria What to look for
    Qualification Green ADI badge, registered on DVSA ADI register
    Vehicle Modern, dual controls, clean, appropriate transmission
    Teaching flexibility Willingness to adapt style to your pace and confidence
    Availability Consistent slot availability, backup if needed
    Reviews Verified, detailed, with recurring positive themes
    Communication Prompt, clear, and professional before lessons begin

    Bear in mind that beginners typically need around 45 hours of professional lessons supplemented by 20 hours of private practice. That is a significant investment of time and money, which makes choosing the right person from the start far more important than it might initially seem.

    My honest take on what actually matters

    In my experience watching learner drivers go through this process, the ones who progress fastest are rarely those who found the instructor with the highest advertised pass rate. They are the ones who found someone they genuinely trusted and felt comfortable with.

    I have seen learners arrive with weeks of lessons behind them, technically covering the right topics but completely lacking in confidence, because their instructor was efficient but cold. The anxiety that builds up in those situations does not just slow progress. It can make a learner doubt whether they are capable at all.

    What I would tell anyone going through this process is simple: pass rate numbers are a starting point, not a destination. The qualities of a good driving instructor go well beyond their DVSA grade. Patience, adaptability, genuine encouragement without false praise, and the ability to notice when you are overwhelmed before you say anything. Those are the things that separate an average instructor from one who will actually get you to where you want to be.

    And if you start lessons and something feels wrong, change. There is no sunk cost worth preserving at the expense of your confidence and safety. The right instructor is out there. Do not settle because switching feels awkward.

    — Simon

    Why Pass4you might be the right fit for you

    If you are looking for an instructor who combines genuine qualifications with the kind of calm, patient teaching style described throughout this guide, Pass4you is worth a serious look. Based in Milton Keynes, Pass4you maintains an 83.33% first-time pass rate at Bletchley, well above the local average, and backs that figure with verified Trustpilot reviews.

    https://pass4you.co.uk

    Lessons are delivered in modern Volkswagen vehicles equipped with dual controls, and instructors are known for adapting their approach to each learner’s pace and confidence level. Whether you are starting from scratch or looking for a more supportive environment after a difficult experience elsewhere, Pass4you offers both learner courses designed around your goals and intensive driving courses for those who want to progress faster. Booking is straightforward by phone or email, and the team can discuss which option suits your situation before you commit to anything.

    FAQ

    What is an ADI and why does it matter?

    An ADI (Approved Driving Instructor) has passed all three parts of the DVSA qualifying exam and is listed on the official register. Choosing an ADI over an unqualified or trainee instructor means your lessons meet government standards and your instructor is properly insured.

    How many lessons will I need before I am test-ready?

    Most beginners need around 45 hours of professional tuition alongside roughly 20 hours of private practice, though this varies depending on how quickly you progress and how consistent your lessons are.

    Can I switch instructors if things are not working out?

    Yes, and you should if the fit is genuinely poor. Staying with an instructor out of loyalty when your progress has stalled or your confidence is suffering will cost you more time and money in the long run than making a change.

    How do I verify a driving instructor’s qualifications?

    Ask for their ADI registration number and check it against the official DVSA ADI register at gov.uk. You can also look for their green badge displayed in the car windscreen during your first lesson.

    Should I prioritise pass rate or teaching style?

    Teaching style and instructor compatibility are the more reliable indicators of your likely success. Pass rates from individual instructors are self-reported and unverified in the UK, so verified learner reviews and a trial lesson will tell you far more about what to expect.

  • How to Deal with Aggressive Drivers When Learning: A Learner’s Guide to Staying Calm

    Did you know that a staggering 81% of learner drivers have experienced intimidation or abuse from other road users? It’s a frustrating reality that seeing those red L-plates can sometimes bring out the worst in others. You’re trying to focus on your clutch control, yet a driver behind you is tailgating or beeping their horn. It’s completely normal to feel your heart race or your confidence dip when you face that kind of pressure. Learning how to deal with aggressive drivers when learning is just as important as mastering your observations or road positioning.

    We believe that learning to drive should be a positive, life-changing experience, not a source of anxiety. This guide will show you how to protect your safety and keep your composure, ensuring that one impatient driver doesn’t ruin your progress. We’ll walk through practical safety steps, mental strategies to block out the bullies, and ways to maintain the confidence you need to continue your journey toward passing your test. You’re in safe hands, and with the right mindset, you can handle any situation the road throws at you.

    Key Takeaways

    • Understand why certain drivers react poorly to L-plates and why their impatience is never a reflection of your actual skills.
    • Master the “Observe and Proceed” framework to learn how to deal with aggressive drivers when learning while keeping your vehicle safe and predictable.
    • Build a psychological “mental shield” to stay calm and reframe aggressive behavior as a simple hazard rather than a personal attack.
    • Discover how professional driving lessons and dual controls provide a supportive safety net while you’re tackling the unique challenges of Milton Keynes’ grid system.

    Why Learner Drivers Face Road Aggression (and Why It’s Not Your Fault)

    It often feels like those red L-plates act as a magnet for impatience. You might notice drivers behind you leaning on their horns or trying to squeeze past in gaps that aren’t quite safe. This phenomenon is frequently called the “L-Plate Effect.” Some drivers see a learner and immediately assume they will be delayed, regardless of how well you are actually driving. It is vital to remember that road aggression is a projection of a driver’s external stress onto you; it’s rarely a reflection of your technical ability. Understanding this shift in perspective is the first step in mastering how to deal with aggressive drivers when learning.

    Legally, you have exactly the same right to be on the road as a driver with thirty years of experience. The road is a shared space. While veterans might have more “muscle memory,” they are still bound by the same Highway Code that you are studying so hard to follow. Their poor time management or personal stress doesn’t grant them priority over your safety. When someone behaves poorly toward you, they are the ones failing the standards of the road, not you.

    The Psychology of the Impatient Driver

    Why do people become so frustrated? Many drivers experience a sense of “deindividuation” when they get behind the wheel. The car acts as a metal shell that makes them feel anonymous, which can embolden people to act like bullies in ways they never would face-to-face. To get a broader perspective on these behaviors, it helps to look at what is road rage? and how it manifests in modern traffic. Most of these drivers have simply forgotten what it felt like to be a beginner. They view their journey as a race against the clock, but their rush is never your emergency. Learning how to deal with aggressive drivers when learning involves recognizing that their behavior is a “them problem,” not a “you problem.”

    Common Triggers for Aggression Toward Learners

    Certain situations tend to provoke impatient reactions more than others. Recognizing these triggers can help you prepare mentally so you don’t feel caught off guard. Common triggers include:

    • Stalling at junctions: This is the most frequent trigger. The few seconds it takes to restart the engine can feel like an eternity when a car is waiting behind you.
    • Strictly following speed limits: In Milton Keynes, many residential areas now have 20mph limits. While you are doing the right thing by sticking to the law, some drivers will feel “held up” by your responsible pace.
    • Complex roundabouts: Taking an extra second to ensure a gap is safe at a busy Milton Keynes roundabout is a sign of a good driver, yet it often draws frustration from those behind who want to “go-go-go.”

    By identifying these moments in advance, you can keep your focus on your controls rather than the person in your rearview mirror. Your job is to stay safe; their job is to wait.

    Identifying Common Aggressive Behaviours and Immediate Safety Steps

    Recognizing the specific ways other drivers show frustration is the first step toward staying safe. When you know what to expect, the behavior becomes less of a personal attack and more of a predictable road hazard. For instance, a 2022 survey by Marmalade found that 68% of learners faced tailgating, while 59% dealt with unnecessary beeping. By categorizing these actions, you can apply a structured response rather than reacting out of fear. Understanding how to deal with aggressive drivers when learning starts with identifying these common “tantrums” and choosing safety over an emotional response.

    You might encounter drivers who flash their headlights or honk their horns. It’s important to distinguish between a genuine warning and a display of impatience. If you’ve stalled, a beep is likely just a sign of the other driver’s frustration. However, if you’re driving safely and following the limit, these signals are often just noise. Similarly, if someone overtakes you aggressively, resist the urge to speed up to “help” them or get out of the way. Maintain your steady pace and predictable road position. This allows them to pass safely without you being forced into a mistake. Following expert tips to avoid aggressive driving can help you keep your cool when others lose theirs.

    Dealing with Tailgaters Safely

    Tailgating is perhaps the most intimidating behavior you’ll face. When a car is glued to your rear bumper, your natural instinct might be to speed up. Instead, apply the “Double the Gap” rule. By increasing the following distance between you and the car in front, you give yourself more time to brake gently. This prevents the tailgater from having to slam on their brakes if you need to slow down. Keep an eye on your mirrors, but don’t become obsessed with the driver behind. Focus on your own path. If the pressure feels like too much, taking professional driving lessons can help you build the resilience needed to manage these high-pressure moments with ease.

    What to Do if You Are Being Shouted At

    Verbal abuse or aggressive hand gestures can be deeply upsetting. If this happens, keep your windows up and your eyes firmly on the road ahead. Avoiding eye contact is a powerful way to de-escalate the situation; bullies often lose interest if they don’t get a reaction. Remember that your L-plates are a legal sign that you’re still practicing. Most people understand this, and those who don’t are simply showing their own lack of patience. Your priority is the car’s controls and the safety of your passengers. By keeping a “blinkered” focus, you ensure that another person’s bad day doesn’t become your bad driving experience. Learning how to deal with aggressive drivers when learning is a skill that will serve you well long after you’ve passed your test.

    How to Deal with Aggressive Drivers When Learning: A Learner’s Guide to Staying Calm

    The “Observe and Proceed” Framework: Practical On-Road Responses

    Once you identify that a driver is being aggressive, your primary duty is to keep your vehicle under control. It is easy to get distracted by someone else’s bad behavior, but your priority must remain your own steering, gears, and observations. This is the heart of how to deal with aggressive drivers when learning. You are the one in the driver’s seat. The person behind you cannot force you to move faster or make a decision that compromises your safety. The “Observe and Proceed” framework helps you acknowledge the aggressive driver as a hazard, similar to a pothole or a stray animal, and then move forward with your own safe driving plan.

    If you are with a professional instructor, they act as your protective buffer. They have an extra set of eyes and an extra set of controls. They can handle any external communication, like explaining a situation to another road user, while you focus on the road ahead. This support allows you to maintain a calm environment inside the car, regardless of the chaos outside. Your instructor is there to manage the “big picture” so you can master the specific skills of your lesson. You don’t have to face the pressure alone.

    Maintaining Your Speed and Position

    Sticking to the speed limit is your legal shield. If you are in a 20mph zone in Milton Keynes, stay at 20mph. Speeding up under pressure makes you more likely to miss a hazard or lose control. A common mistake is “gutter driving,” where learners pull too far to the left to let people pass. This actually invites dangerous, narrow overtakes that put you at risk. Stay in your normal, safe road position. Being predictable is the best way to discourage others from taking risks around you.

    The Safe Pull-Over Technique

    Sometimes the best way to handle a stressful situation is to remove yourself from it entirely. If you feel your heart rate rising or your hands shaking, look for a safe, legal, and convenient place to stop. This isn’t giving up; it’s a professional management of a road hazard. Once you have parked safely, turn off the engine and take a few minutes to reset. Talk to your instructor about the incident. A five-minute break can be the difference between a lesson that feels like a failure and one that ends with a breakthrough in confidence. Mastering how to deal with aggressive drivers when learning involves knowing when to take that pause. It’s a sign of a mature, responsible driver.

    Building Psychological Resilience: The Learner’s Mental Shield

    Mastering the physical controls of a car is only half the battle. The other half takes place in your mind. When you are on the road, it is helpful to use the “Bubble” visualization. Imagine a thick, transparent shield surrounding your car. This shield lets you see everything around you for safety, but it blocks out the noise, the gestures, and the negative energy of others. By creating this mental barrier, you ensure that your cabin remains a calm space for learning. Understanding how to deal with aggressive drivers when learning involves recognizing that you don’t have to let their stress inside your vehicle.

    Reframing the situation is equally powerful. Instead of seeing an angry person, see a “moving hazard.” You wouldn’t take it personally if a traffic light turned red or a pedestrian stepped out; you would simply manage the hazard. Treat an aggressive driver the same way. Your only responsibility is to the practical driving test standards, not the driver behind. If you are meeting those standards, you are doing your job perfectly. You might even find it helpful to repeat a simple phrase to yourself, such as “I am safe, I am in control, and I am learning.”

    Processing the Event Mid-Lesson

    If a specific incident, like a stall or a missed turning, triggers a reaction from someone else, you need a quick way to reset. Try the “Box Breathing” technique. Inhale for four seconds, hold for four, exhale for four, and hold for four. This physically lowers your heart rate and clears your head. It is also vital that you don’t apologize to the bully. A wave of apology often validates their rage and makes you feel “wrong” when you are simply practicing a new skill. Focus entirely on the next 100 yards of road. What happened in the last 100 yards is over and cannot be changed.

    Post-Lesson De-briefing

    Once the lesson ends, take time to talk through the encounter with your instructor. They can help you see that your response was safe and professional. You should even record these moments in your progress log as a “Hazard Management” success. Learning how to deal with aggressive drivers when learning is a key milestone. Successfully navigating a situation with a road bully proves you are becoming a competent driver who can handle real-world pressure. If you want to build this resilience in a supportive environment, our patient instructors are here to help. You can start your journey by booking your next set of driving lessons today.

    How Professional Instruction in Milton Keynes Neutralises Driving Anxiety

    Professional instruction is the final piece of the puzzle when figuring out how to deal with aggressive drivers when learning. While mental shields and breathing techniques are vital, having an expert by your side provides a physical safety net that no amount of theory can replace. At Pass4you, our instructors are trained to act as a protective barrier between you and the occasionally hostile road environment. We don’t just teach you to drive; we help you develop the calm, methodical mindset that contributes to our 83.33% high-precision success rate. This focus on emotional stability ensures you feel like you’re in safe, professional hands from your very first lesson.

    A calm mentor makes a world of difference. When you’re faced with road rage, your instructor’s steady voice can prevent a minor incident from becoming a total loss of confidence. They’ve seen it all before and know exactly how to de-escalate a situation before it affects your steering. This support allows you to focus on your progress rather than the behavior of others. You’re not just learning to pass a test; you’re learning to remain a composed, responsible driver for life.

    The Role of the Dual-Control Vehicle

    One of the biggest advantages of professional driving lessons is the dual-control system. If an aggressive driver performs a dangerous maneuver, your instructor can intervene instantly to keep you safe. You are never truly out of control. This makes professional lessons significantly safer than private practice, especially in high-stress urban areas. The “Tuition” sign on our vehicles also serves as a legal notice to others. It warns them to expect the unexpected, shifting the legal and social responsibility onto them to maintain a safe distance. It acts as a shield, giving you the space you need to practice without constant harassment.

    Mastering Milton Keynes Roundabouts with Confidence

    Milton Keynes is famous for its unique grid system and high-speed roundabouts. These can be intimidating for anyone, especially when a driver behind is revving their engine or creeping forward at a junction. Our instructors specialize in these specific local challenges. We teach you how to time your entries perfectly so you don’t feel forced into a gap that isn’t there. You’ll learn the confidence to hold your lane and ignore the pressure from behind. Knowing exactly how to deal with aggressive drivers when learning on the MK grid makes the eventual practical test feel much more manageable. You’ll move from feeling intimidated to feeling completely in command of your journey, ready to enjoy the freedom that comes with your pink license.

    Drive Forward with Confidence and Calm

    You now have the tools to protect your safety and your peace of mind. By using the mental shield and the “Observe and Proceed” framework, you can ensure that other people’s impatience never dictates your actions. Your journey is about steady progress, not meeting the demands of a driver in a rush. Learning how to deal with aggressive drivers when learning is a vital skill that transforms you into a resilient, capable road user ready for any situation. These moments of pressure are simply hazards to manage, and every time you stay calm, you’re proving you’re ready for the road.

    At Pass4you, we provide a supportive environment designed to help you succeed without the stress. Our first-class, patient instructors in Milton Keynes guide you through every challenge in modern Volkswagen tuition vehicles equipped with dual controls for your total peace of mind. This supportive approach is a key reason why we maintain an impressive 83.33% first-time pass rate. Don’t let road bullies hold you back from the freedom and opportunities that come with your license. Book your first lesson with a patient Pass4you instructor today. You have the right to feel safe and confident every time you get behind the wheel, and we are here to make sure you do.

    Frequently Asked Questions

    Is it illegal for drivers to be aggressive toward learners?

    Yes, aggressive driving can be prosecuted as “careless and inconsiderate driving” or even “dangerous driving” under the Road Traffic Act. Intimidation, tailgating, and verbal abuse are all serious offenses that the police can investigate. You have a legal right to be on the road, and other drivers are required by the Highway Code to show extra patience toward those with L-plates.

    Should I pull over if someone is tailgating me?

    You should only pull over if you can find a safe, legal, and convenient place to do so. If the pressure from a tailgater is making you feel anxious or distracted, finding a quiet side road or a parking bay to reset is a smart move. Never feel forced to pull over in a dangerous spot or onto a soft verge just to let an impatient driver pass.

    What should I do if I stall and someone starts honking their horn?

    Focus entirely on your restart procedure and block out the noise. Take a deep breath, apply your handbrake, and go through your “prepare, observe, move” routine at your own pace. The driver behind is simply showing their own lack of composure. Your only priority is to secure the car and move off safely when you are ready.

    Does having a “Learner Driver” sign actually make people more aggressive?

    Statistics suggest that L-plates can unfortunately trigger impatience in a small minority of drivers. A 2022 survey found that 81% of learners experienced some form of intimidation. Learning how to deal with aggressive drivers when learning involves accepting that while the plates are a legal necessity, the reaction of others is a reflection of their stress, not your driving ability.

    How can I stop my legs from shaking after a scary encounter on the road?

    The best way to stop the shaking is to pull over safely and practice deep, rhythmic breathing. This shaking is a natural adrenaline response to a stressful situation. Take five minutes to turn off the engine, have a drink of water, and talk to your instructor about what happened. This physical reset helps your nervous system return to a calm state before you continue your lesson.

    Can I fail my driving test if someone else is aggressive toward me?

    You will not fail your test because of another person’s bad behavior. Examiners are highly experienced and can easily spot when another driver is being unreasonable. As long as you react calmly, maintain your safe road position, and don’t let their aggression force you into making a mistake, your result will be based solely on your own performance.

    What is the best way to ignore a driver who is shouting at me?

    Keep your windows firmly closed and avoid making any eye contact. Bullies often look for a reaction to fuel their anger, so refusing to look at them is a powerful way to de-escalate the situation. Keep your eyes on the road ahead and continue your observations as normal. Your silence and focus are your best defenses against verbal abuse.

    How do Pass4you instructors help with nervous learners?

    Our instructors use a reassuring and patient approach specifically designed to alleviate anxiety. We use modern, dual-controlled vehicles to ensure you always have a safety net while you practice. By teaching you how to deal with aggressive drivers when learning, we help you build the mental resilience and technical skills needed to join our many successful students who pass their tests with confidence.

  • Find affordable driving lessons locally in Milton Keynes

    Find affordable driving lessons locally in Milton Keynes

    Many learner drivers in Milton Keynes face the same frustrating problem: they want to find affordable driving lessons locally, but every time they look, they either find rock-bottom prices with questionable quality or decent instructors charging more than their budget allows. It does not have to be that way. This guide walks you through exactly what to look for, how to compare your options intelligently, and how to get the most out of every lesson so you spend less overall and pass sooner.

    Table of Contents

    Key takeaways

    Point Details
    Evaluate cost per hour, not just headline price Package deals often reduce your hourly rate and deliver better value than paying per lesson.
    Verify instructor credentials first Always check qualifications and recent reviews before committing to any driving school.
    Ask about all fees upfront Hidden charges like test-day car hire can significantly increase what you actually pay.
    Practise between lessons Instructors recommend 20 to 25 hours of private practice alongside tuition to accelerate progress.
    Flexible scheduling matters Lessons that fit around work or study commitments keep your momentum and reduce total learning time.

    What to consider before you find affordable driving lessons locally

    Before you type “cheap driving classes near me” into a search engine and click the first result, it pays to know what you are actually evaluating. Affordability is not just about the hourly rate on a website. It is about the total cost of getting your licence, and that number depends on far more than price per lesson.

    Instructor qualifications and reviews

    Any instructor worth your money should be DVSA-registered and hold a current ADI (Approved Driving Instructor) badge. This is not optional. Beyond the badge, read recent student reviews on Google or Trustpilot. Look for comments that mention patience, clear explanations, and how the instructor handles nerves. One or two bad reviews in a sea of five-star feedback is normal. A pattern of complaints about poor communication or rescheduling is a red flag.

    Instructor holding ADI badge and checklist

    Lesson structure and teaching approach

    Structured, step-by-step learning builds safer long-term driving habits rather than cramming for the test. Ask potential instructors how they structure their lessons. Do they assess your progress regularly? Do they explain the reasoning behind each skill, or just tell you what to do? A good instructor teaches you to drive, not just to pass.

    Lesson structure process steps infographic

    Vehicle condition and lesson duration

    Check that the school uses modern, well-maintained cars with dual controls. Worn-out vehicles are not just uncomfortable. They are a safety concern and can affect how natural the car feels during your test. Also clarify lesson duration. Some schools advertise low prices but deliver 45-minute sessions instead of the standard hour.

    Transparent pricing and what is included

    This is where many learners get caught out. Verify upfront whether fees like fuel, insurance, or test-day vehicle hire are included in your package. A lesson package that looks cheap can turn expensive quickly if you are charged separately for every additional service.

    Flexible payment options

    Budget-friendly driving lessons do not always mean paying everything upfront. Many schools offer payment plans. Deposits as low as £100 with the remainder split across instalments make lessons far more manageable on a tight budget. Always ask what payment options are available before you rule a school out based on the total package cost alone.

    Pro Tip: Ask specifically whether the test-day car hire is included in your package price. This single question could save you £50 to £80 that most learners only discover they owe when their test date arrives.

    How to search and compare local driving schools

    Once you know what you are looking for, the process of finding and comparing local driving instructors becomes much less overwhelming. Here is a practical approach that works specifically for learner drivers in Milton Keynes.

    1. Start with a local search. Search for affordable driving courses nearby using Google Maps or the DVSA’s Find a Driving Instructor tool. Filter by your postcode area and look for schools with a solid volume of recent reviews, not just a high rating from years ago.

    2. Read reviews with purpose. Do not just look at star ratings. Look for reviewers who mention their test pass rate, how the instructor handled nerves, and whether the school was flexible when life got in the way. This tells you far more than a number.

    3. Request a full pricing breakdown. Contact at least three local schools and ask for their complete pricing, including what is and is not included. This gives you a proper like-for-like comparison rather than comparing headline figures.

    4. Compare cost per hour, not total package price. Higher upfront package costs often reduce your effective hourly rate. A 20-lesson block at £29 per hour costs less overall than paying £33 per lesson individually, even if the block payment feels larger upfront.

    5. Ask about scheduling flexibility. Can you book evenings or weekends? What is the cancellation policy? Flexible scheduling is especially important if you are balancing work or study with learning to drive.

    6. Consider intensive vs. regular lessons. If you want to pass within weeks rather than months, an intensive course concentrates your hours into a short period. This suits some learners well. Others retain skills better with regular weekly lessons. Be honest with yourself about which approach fits how you learn.

    Here is a quick comparison to help frame your thinking:

    Lesson type Best for Typical cost structure
    Weekly lessons Building steady confidence over time Pay per lesson or small block
    Block package Reducing hourly rate with commitment Larger upfront payment
    Intensive course Fast-track to test readiness Higher total, shorter timeframe

    Pro Tip: When asking about discount driving lessons or local packages, always request a written quote by email. This protects you if the price changes between enquiry and booking.

    Common mistakes to avoid when looking for cheap lessons

    Searching for inexpensive driving schools is sensible. Choosing poorly because of price alone is where learners lose both money and time. These are the mistakes worth knowing before you commit.

    • Vague or changing pricing. If a school cannot give you a clear, written price that covers everything, walk away. Transparent communication about what is included avoids unexpected cost surprises and is the mark of a school that respects its students.

    • No accreditation or lapsed credentials. Always confirm the instructor holds a current ADI badge. An unregistered instructor is illegal and uninsured.

    • Cutting lesson hours to save money. This is one of the most common and costly mistakes. Taking fewer hours than you need to cut costs up front almost always results in more lessons later. Checking credentials and reading reviews should always come before deciding on price.

    • Outdated or poorly maintained vehicles. A car that pulls to one side, has worn tyres, or feels nothing like a modern test vehicle will make your test harder, not easier.

    • Rigid, one-size-fits-all instruction. Some schools run through a fixed checklist regardless of how the individual learner is progressing. If an instructor is not adjusting to your pace or acknowledging your specific challenges, you are not getting value for money.

    “Prioritising quality instruction methods over solely low prices leads to safer driving development and, ultimately, fewer lessons needed overall.” Source

    This is not about spending more. It is about spending wisely. A slightly higher hourly rate with a patient, experienced instructor often means fewer total lessons and a better chance of passing first time.

    Getting the most from your budget-friendly driving lessons

    Once you have found your instructor and booked your lessons, the work is not finished. How you approach your learning between and during lessons has a direct impact on how quickly you progress and how much you ultimately spend.

    • Practise privately between lessons. Instructors recommend 20 to 25 hours of private practice alongside professional tuition for the best results. Even quiet car parks or low-traffic roads with a supervising driver help your muscle memory develop faster than lessons alone.

    • Communicate openly with your instructor. If you feel anxious about roundabouts, tell them. If you are struggling with a specific manoeuvre, say so before the lesson, not at the end. Your instructor can only tailor your lesson to your needs if they know what those needs are.

    • Choose one-to-one lessons where possible. Shared lessons split the instructor’s attention and reduce the personalised feedback you receive. Students who progress at their own pace with focused individual support tend to achieve better pass rates.

    • Take advantage of lesson packages. If your school offers a structured package with a set number of hours, use it. Packages typically include enough hours to cover all required skills properly, reducing the risk of arriving at your test underprepared.

    • Maintain consistent momentum. Weekly lessons keep skills fresh. Gaps of two or three weeks between lessons mean you often spend the first part of your next lesson revisiting ground you already covered. Consistency is one of the cheapest ways to reduce your overall lesson count.

    Pro Tip: Use the Pass4you blog for free resources between lessons. Revision on theory, hazard perception tips, and route familiarity all contribute to a faster, cheaper path to your test.

    My honest take on finding affordable lessons that actually work

    I have seen a lot of learner drivers come through the doors of driving schools in Milton Keynes over the years, and there is a pattern that repeats itself constantly. The ones who try to find the absolute cheapest option often end up spending more. They take 30 lessons with an instructor who is not quite right for them, feel unconfident, fail their test once or twice, and then switch schools anyway. The “cheap” option turned out to cost them several hundred pounds more.

    What I have found genuinely works is this: look for quality instruction at a fair, transparent price. Not the lowest price in town. A fair price with clear terms and a patient instructor who adapts to your pace. That combination gets people through their test first time, and first-time passes are where the real savings are.

    In my experience, the learners who do best are the ones who communicate openly with their instructor, practise consistently between lessons, and do not rush the process because they booked too few hours to save money upfront. Patience and consistency matter more than price per hour. When you find a local school that is honest about costs, flexible with scheduling, and serious about your individual progress, that is the one worth booking. Everything else is just marketing.

    — Simon

    Ready to learn with Pass4you in Milton Keynes?

    If you are looking for find driving lessons on a budget without compromising on the quality that gets you through your test, Pass4you offers exactly the combination this article describes.

    https://pass4you.co.uk

    Pass4you is based in Milton Keynes and holds an 83.33% first-time pass rate, significantly above the local average. Lessons are delivered by calm, patient instructors in modern Volkswagen vehicles with dual controls, and all pricing is transparent with no hidden fees. Whether you prefer weekly lessons or want to fast-track your learning, you can explore learner driving packages built specifically for new drivers, or check out intensive driving courses if you want to reach test standard quickly. Flexible scheduling is available, and the team is happy to discuss payment options that work for your budget. Get in touch today to find out which course fits your needs.

    FAQ

    How do I find affordable driving lessons near me?

    Search for local driving instructors using the DVSA’s official tool or Google Maps, then request written quotes from at least three schools. Compare cost per hour and ask exactly what is included before booking.

    What should I look for in a local driving instructor?

    Check that your instructor holds a current DVSA ADI badge, read recent reviews for mentions of patience and flexibility, and confirm all pricing in writing before you commit to any lessons.

    Are intensive driving courses cheaper than weekly lessons?

    Intensive courses can reduce your total lesson count but require a larger upfront payment. They are cost-effective if you learn quickly under focused conditions, but weekly lessons suit learners who retain skills better over time.

    How can I reduce the overall cost of learning to drive?

    Practise privately between lessons, maintain a consistent weekly schedule to avoid skill fade, and choose a structured lesson package rather than paying per individual lesson. These steps often cut the total number of lessons needed.

    What hidden fees should I watch out for with cheap driving lessons?

    Ask whether test-day vehicle hire, fuel, and insurance are included in your package price. These extras can add £50 to £100 or more to your total cost if they are not disclosed upfront.

  • Driving Lessons in Bad Weather UK: A Guide to Building Real-World Confidence

    What if a heavy downpour is actually the most valuable part of your training? While it’s natural to feel a surge of anxiety when you see grey clouds before your session, taking driving lessons in bad weather uk is often the secret to becoming a truly competent driver. You aren’t alone if you worry about skidding on wet roads or losing visibility in thick fog. Most learners feel a bit of dread when the conditions aren’t perfect, especially since research shows that 9 out of 10 weather-related serious injuries on our roads happen in the rain.

    We believe that facing these conditions with a calm, professional mentor by your side is the best way to build lasting confidence. This guide explains why adverse weather is your greatest training tool and how to handle a car safely when the British climate turns. You will discover how to manage stopping distances that can double in the wet, when to use your fog lights if visibility drops below 100 metres, and what the current DVSA rules are for test cancellations. By the end, you’ll feel ready to handle any season with ease and stay safe behind the wheel.

    Key Takeaways

    • Discover how “weather-proofing” your skills creates a safer, more resilient driver compared to those who only train in perfect conditions.
    • Master essential techniques for handling aquaplaning and learn how to adjust your following distances during heavy rainfall.
    • Understand the specific DVSA policies regarding cancellations so you know exactly what to do if it snows on your test day.
    • Gain confidence by taking driving lessons in bad weather uk to practice vital safety checks and “Show Me, Tell Me” questions in a real-world environment.
    • Learn how professional instructors help you navigate tricky Milton Keynes roundabouts when road surfaces are greasy and visibility is poor.

    Should You Take Driving Lessons in Bad Weather?

    When the clouds turn grey and the rain starts to lash against the window, your first instinct might be to call your instructor and reschedule. However, taking driving lessons in bad weather uk is one of the most effective ways to build your confidence and ensure you’re ready for the reality of British roads. It is easy to drive when the sun is shining and the tarmac is dry, but true skill is developed when conditions are less than perfect. Learning to manage wind, rain, and reduced visibility under professional guidance turns a potentially scary experience into a valuable teaching moment.

    The DVSA explicitly recommends that learner drivers experience a wide range of weather conditions during their training. This proactive approach ensures you aren’t caught off guard after you pass your test and find yourself driving alone in a storm. Safety is always our primary concern, and it’s helpful to remember that professional instructor vehicles are equipped with dual controls. This provides a safety net that learning with a friend or parent cannot match. Your instructor is trained to stay calm and can intervene instantly if the car reacts unexpectedly to a large puddle or a sudden gust of wind, keeping you in safe, professional hands at all times.

    The Benefits of Learning in Adverse Conditions

    Driving in the rain or wind helps you build essential muscle memory that you simply won’t develop on a clear day. You will learn how to operate your windscreen wipers and demisters instinctively, without needing to take your eyes off the road to find the controls. Understanding how the car feels on a slippery surface while under expert supervision is a vital part of your development. It also gives you a significant psychological edge over other learners. While others might feel anxious when the weather turns, you will remain calm because you have already mastered these challenges. Learning these defensive driving techniques early on helps you anticipate hazards before they become dangerous situations.

    Why Proactive Training Beats Avoiding the Rain

    You cannot choose the weather on the day of your driving test. If you have spent all your lessons in the sun and it pours during your exam, your anxiety levels will naturally spike. Weather-proofing is the process of mastering vehicle control in non-ideal conditions. By facing the rain during your driving lessons in bad weather uk, you turn a potential obstacle into a tool for success. Professional instructors provide a structured environment where you can test your limits safely. They help you understand the physics of the road, such as how water affects your grip, ensuring you become a responsible and capable driver for life.

    Learning to handle the elements is a practical skill that sets you apart from drivers who only practice in the sun. When you take driving lessons in bad weather uk, you’ll learn that heavy rain requires more than just faster wipers. Aquaplaning occurs when a layer of water builds up between your tyres and the road, causing you to lose steering control. If you feel the steering become light, don’t panic. Simply ease your foot off the accelerator and keep the steering wheel straight until you feel the tyres grip the tarmac again. Facing these elements during your driving lessons in bad weather uk transforms you into a more observant and capable driver.

    Stopping Distances: Dry vs. Wet Roads

    Understanding the physics of a wet road is crucial for your safety. On a dry day, the “two-second rule” helps you maintain a safe gap from the car in front. However, in wet weather, your stopping distance at least doubles. This change is dramatic and requires immediate adjustment to your speed and positioning.

    • At 30mph: You’ll need roughly 46 metres to stop in the wet, compared to just 23 metres on dry roads.
    • At 70mph: That distance jumps from 96 metres to a staggering 192 metres.

    Doubling the gap is the golden rule because it gives you the vital thinking time needed to react to hazards. After driving through a deep puddle, remember to tap your brake pedal lightly when it’s safe to do so. This simple action helps dry the brake discs and ensures they work effectively when you need them most.

    Mastering Visibility and Lighting

    Visibility can change in seconds. You are required to use headlights when you cannot see for more than 100 metres. While your driving lessons will teach you the location of every switch, knowing exactly when to use them is the real challenge. Use dipped headlights in heavy rain or dull light to ensure other road users can see you clearly. Only use fog lights when visibility is seriously reduced, and remember to switch them off once it improves to avoid dazzling others.

    Managing interior condensation is just as important as cleaning the outside of the glass. Use your heater and air conditioning to demist the windows before you set off. This ensures you have a clear view of your surroundings at all times. Expert advice on Navigating UK Rain, Fog, and High Winds often emphasizes that being seen is just as important as being able to see.

    Finally, be mindful of high winds. Strong gusts can push a small learner car off course, especially on open roads or bridges. When passing high-sided vehicles, expect a sudden buffeting effect as you move in and out of their windbreak. Keep a firm but relaxed grip on the wheel and allow extra room for cyclists or motorcyclists who may be blown sideways by the gale.

    Driving Lessons in Bad Weather UK: A Guide to Building Real-World Confidence

    Will My Driving Test Be Cancelled? The DVSA Bad Weather Policy

    Waking up to a storm on the morning of your driving test can feel like a setback, but understanding the DVSA Bad Weather Policy will help calm those nerves. The Driver and Vehicle Standards Agency (DVSA) prioritises safety above all else. They won’t conduct tests in truly dangerous conditions, such as icy roads, flooding, or thick fog. However, a bit of rain or wind won’t stop the exam. This is why driving lessons in bad weather uk are so beneficial. They ensure you’re prepared to perform your best, even if the clouds look threatening when you arrive at the test centre.

    If the DVSA decides to cancel your test due to the weather, you don’t need to do anything to rebook. They will automatically find a new date for you. You’ll usually receive these new details within three working days, though it can take up to seven days during prolonged periods of winter weather. It’s important to know that you cannot claim out-of-pocket expenses, such as the cost of your instructor’s car hire, for cancellations caused by the weather. While this can be frustrating, it’s a standard policy across the UK.

    How the DVSA Defines “Dangerous Conditions”

    There is a clear difference between “wet” and “dangerous.” Standard rain is rarely a reason for cancellation. Examiners look for conditions that make it impossible to assess your driving safely. This includes standing water that could cause aquaplaning or ice that makes the road surface treacherous. Local test centres, such as Bletchley, have specific protocols for assessing nearby routes. The examiner makes the final safety call on the morning of the test. If you have concerns, call the phone number on your booking confirmation email. Do this on the day of your test, as staff won’t be able to give you a definitive answer the night before.

    What to Do if Your Test is Cancelled

    If you receive a cancellation notice, stay positive. Use the extra time to refine your skills. You can review our practical driving test guide to stay mentally sharp while you wait for your new date. If it’s safe to travel, we often recommend still having your scheduled pre-test lesson. Practising your driving lessons in bad weather uk with your instructor provides a safe environment to master the very conditions that caused the cancellation. This keeps your momentum going and ensures you feel even more confident when your new test date arrives.

    Safety Checks and Preparation for Adverse Conditions

    Becoming a confident driver starts before you even turn the key. When you take driving lessons in bad weather uk, your instructor will guide you through the vital safety checks that keep you and other road users safe. Preparation is the antidote to panic when the British weather turns unpredictable. A core part of this preparation involves mastering the “Show Me, Tell Me” questions. You might be asked how to check the brakes are working, how to operate the demister, or how to switch on your rear fog lights. Knowing these controls inside out ensures you stay focused on the road rather than fumbling for a switch when visibility suddenly drops.

    One of the most critical safety factors in the rain is your tyres. The legal minimum tread depth in the UK is 1.6mm across the central three-quarters of the tyre. However, having more tread provides much better grip on wet surfaces. During your driving lessons in bad weather uk, you’ll learn how to check this depth and understand why it matters for your stopping distance. Proper preparation also extends to what you wear. Wet, slippery shoes can easily slide off the pedals, so choosing comfortable, flat footwear with good grip is essential for maintaining precise control of the car.

    Pre-Drive Vehicle Checks

    Before setting off in poor conditions, take a moment to ensure your vehicle is ready. Check that all your lights are clean and working correctly, as dirt and road salt can quickly obscure them. Your wiper blades should clear the screen effectively without smearing or making unusual noises. It’s also vital to verify your fluid levels. Ensure your screen wash is topped up and contains anti-freeze properties to prevent the jets from freezing or the liquid from turning into ice on your windscreen during a cold snap.

    The Learner’s Mental Toolkit

    Your mental state is just as important as the car’s condition. Driving in heavy traffic during a storm can feel overwhelming, but staying calm is key to making safe decisions. If you feel your anxiety rising, take a deep breath and remember that your instructor is there to support you. We encourage open communication; if the conditions feel too intense, tell your instructor immediately. They can help you break down the situation into manageable steps, ensuring you always feel in safe, professional hands. If you’re ready to build your skills with a patient mentor, book your driving lessons today and start your journey toward becoming a confident, all-weather driver.

    Build Confidence with Professional Lessons in Milton Keynes

    At Pass4you, we don’t just teach you to drive; we prepare you for the reality of the British roads. Taking driving lessons in bad weather uk with our team means you’ll never feel caught out by a sudden change in the forecast. Our instructors monitor local weather patterns closely. They tailor each session to ensure you’re learning the most relevant skills for the day’s conditions. You’ll train in modern, well-maintained Volkswagen vehicles. These cars offer excellent visibility and safety features, helping you feel secure even when the clouds are dark.

    Milton Keynes features a unique road layout that requires specific techniques in the wet. Our instructors have deep local knowledge of the area’s roundabouts, which can become incredibly greasy and slippery after a light rain. We’ll show you how to adjust your approach speed and steering to stay safe. Learning these nuances under professional supervision ensures you’re always in safe, professional hands.

    Local Expertise for Milton Keynes Learners

    The H and V grid system can feel very different when visibility is low. We’ll help you navigate these roads with confidence, focusing on clear lane discipline and proactive hazard perception. If you’re practicing on a dual carriageway during high winds, we’ll teach you how to keep the car stable and react to sudden gusts. Our team also knows exactly which areas near the local test centres are prone to flooding. This insight allows us to guide you safely through the most challenging routes without unnecessary stress.

    Join the Success Stories at Pass4you

    We specialise in helping nervous learners find their feet. Our patient, calm teaching style is designed to build your self-belief, one lesson at a time. We’re incredibly proud of our 83.33% pass rate. This high success metric includes many students who faced rain, wind, or fog on their test day and came out with a pass. It shows that professional driving lessons in bad weather uk give you a massive advantage over those who only practice in the sun.

    Don’t wait for the “perfect” day to start your journey. You can book your driving lessons in Milton Keynes today regardless of the season. Every session you complete in the rain or wind is a valuable step toward your pink license and a lifetime of safe, confident driving.

    Ready to Master the Roads in Any Season?

    Facing the elements might feel daunting at first, but it’s the quickest way to transform from a learner into a truly resilient driver. You now know how to manage aquaplaning, double your stopping distances, and navigate DVSA cancellation rules. This knowledge turns a rainy day into a powerful training opportunity. By choosing to take driving lessons in bad weather uk, you ensure that no forecast stands in the way of your freedom.

    Our patient and first-class driving instructors support you with an approach that has helped us achieve an impressive 83.33% first-time pass rate. You’ll learn in modern, well-maintained Volkswagen tuition vehicles designed for safety and comfort. Whether you’re tackling a greasy roundabout or a windy dual carriageway, you’re always in safe, professional hands.

    Don’t let a few clouds hold you back from achieving your goals. Book your Milton Keynes driving lessons with Pass4you today and start building the real-world confidence you need to succeed. You’re closer to that pink license than you think, and we’re with you every mile of the way.

    Frequently Asked Questions

    Do driving lessons get cancelled in rain?

    Driving lessons rarely get cancelled just because of rain. In fact, we encourage you to keep your appointment as it’s the perfect time to practice using your wipers and adjusting your speed for wet tarmac. Your instructor will only postpone a session if conditions become truly dangerous, such as severe flooding that makes the roads impassable or unsafe for your current skill level.

    What happens if it snows on my driving lesson day?

    Your instructor will make a safety call based on the local road conditions on the morning of your session. If the snow is heavy or the roads are icy, we may reschedule your lesson to ensure you stay in safe, professional hands. We’ll contact you as early as possible to let you know if a change is needed, so you don’t have to worry about a dangerous drive.

    Is it harder to pass a driving test in bad weather?

    Passing your test in bad weather isn’t inherently harder if you’ve had the right training. Examiners look for how well you adapt your driving to the current environment. If you demonstrate that you can manage visibility and stopping distances effectively, you prove you’re a responsible driver. Taking driving lessons in bad weather uk ensures you have the skills to handle these variables with total confidence on your big day.

    Can I cancel my driving lesson if I am scared of the wind?

    We understand that high winds can feel intimidating for new drivers. However, we recommend going ahead with the lesson so your instructor can show you how to keep the car stable. Learning to handle gusts and buffeting from high-sided vehicles with a patient mentor is much safer than trying to figure it out alone after you pass. Please check our standard policy for notice requirements if you still wish to reschedule.

    How do I use fog lights during a driving lesson?

    You should only use your fog lights when visibility is seriously reduced, which the Highway Code defines as being unable to see for more than 100 metres. Your instructor will show you exactly where the switches are in our modern Volkswagen cars. It’s vital to remember to turn them off once the fog clears so you don’t dazzle other road users. This is a common “Show Me, Tell Me” topic.

    What is the stopping distance on a wet road at 30mph?

    At 30mph, your stopping distance on a wet road is approximately 46 metres. This is exactly double the 23 metres required on a dry surface. During your driving lessons in bad weather uk, we’ll help you visualise this gap so you can maintain a safe distance from the car in front. Understanding these physics is a core part of becoming a safe and proficient driver who can handle any UK road condition.

    Will the examiner fail me if I drive too slowly in the rain?

    You won’t fail for driving at a sensible speed that matches the conditions. Examiners actually expect you to slow down when visibility is poor or the road is slippery. However, you must still maintain safe progress where possible. If you drive excessively slowly on a clear road just because it’s slightly damp, it could be seen as a lack of confidence. Your instructor will help you find the right balance.

    Does Pass4you provide winter driving tips for beginners?

    Yes, we integrate practical winter driving tips into every lesson when the temperature drops. Our instructors will teach you how to clear your windows and mirrors properly before setting off and how to use higher gears to pull away on icy surfaces. We focus on building your real-world confidence so you feel prepared to drive safely through every season. Our goal is to ensure you feel in safe, professional hands at all times.

  • What does a driving school review mean?

    What does a driving school review mean?

    When you’re searching for the right place to learn to drive, you’ll encounter two things almost immediately: official accreditation badges and pages of online reviews. Many learners assume that accreditation is enough of a guarantee. It isn’t. Understanding what does driving school review mean, and how it differs from formal accreditation, is the difference between choosing a school that looks legitimate on paper and one that will actually get you through your test. This article breaks down both, so you can read ratings and feedback with confidence.

    Table of Contents

    Key takeaways

    Point Details
    Reviews reflect real experience Student feedback reveals instructor quality, patience, and teaching style in ways accreditation cannot.
    Accreditation is a legitimacy filter Official approval confirms a school can operate legally, but it does not measure how well it teaches.
    Patterns matter more than stars Look for recurring themes across multiple reviews rather than relying on an overall rating alone.
    Transparency signals quality Schools that are open about pricing, curriculum, and instructor credentials are far more trustworthy.
    Trial lessons reduce risk A warm-up or introductory lesson helps you assess fit before committing to a full course.

    What does driving school review mean, and how does it differ from accreditation?

    These two terms are often used interchangeably, but they measure completely different things. Accreditation confirms legitimacy; reviews provide insight into instructor patience, scheduling, and teaching effectiveness. Put simply, accreditation tells you a school is allowed to operate. Reviews tell you whether it’s worth choosing.

    Accreditation is granted by a licensing or regulatory authority. In the UK, this typically means the Driving and Vehicle Standards Agency (DVSA) approves the school’s instructors and confirms the business meets minimum legal requirements. It’s a baseline, not a badge of excellence.

    A driving school review, by contrast, is a public assessment written by someone who has actually paid for lessons and sat in that car. It captures things no regulator can audit: whether the instructor made you feel calm or anxious, whether the school answered the phone when you needed to reschedule, or whether the pass rate they advertised matched the reality of their teaching. That’s the driving school review significance that many learners underestimate when they first start searching.

    The table below shows the key differences clearly.

    Factor Accreditation Reviews
    Who provides it Licensing authority Past students
    What it measures Minimum legal standards Actual student experience
    Updated how often Periodically Continuously
    Reflects teaching quality Rarely Directly
    Useful for Filtering out illegal schools Evaluating quality and fit

    Infographic comparing accreditation and reviews

    Pro Tip: Always verify a school’s current accreditation status directly with the relevant authority. Logos and badges on websites can be outdated, so do not take them at face value.

    How to interpret driving school reviews effectively

    Understanding driving school reviews means knowing what to look for beyond a star rating. A four-star average means very little if fifty of the reviews mention the same instructor keeping students waiting or pushing unnecessary extra lessons. Here’s how to read them properly.

    • Look for recurring themes. A single complaint about a rescheduled lesson is forgivable. If ten different reviewers mention poor scheduling, that’s a pattern worth taking seriously. The same logic applies to praise. If multiple students specifically mention that an instructor was calm under pressure, that tells you something genuine about teaching style.
    • Assess how the school responds. Patterns in negative reviews and poor response to complaints often reveal bigger issues than negative ratings alone. A school that dismisses or ignores criticism publicly is unlikely to handle your concerns differently.
    • Scrutinise pass rate claims carefully. Some schools report first-time pass rates as high as 98%, but you need to ask: how many students does that figure cover? A school with three students passing in a row can claim 100%. Check whether the figure is independently verified or just self-reported marketing.
    • Watch for red flags. Reputable schools are transparent about pricing, lesson structure, and instructor qualifications. Vague or evasive answers to direct questions about costs or training hours are warning signs, not minor inconveniences.
    • Check instructor qualifications. Instructors should hold permanent licences and complete mandated training hours. Reviews that mention an instructor being newly qualified, unprepared, or frequently substituted with cover instructors are worth noting.

    Pro Tip: When reading reviews on platforms like Trustpilot or Google, filter by “most recent” rather than relying on the default sort. School quality changes over time, and reviews from two years ago may not reflect the current team.

    Industry standards and what they tell you about review claims

    Knowing the baseline requirements for reputable driving schools helps you evaluate what you read in reviews. Many learners have no frame of reference for what a good school actually delivers, which makes it hard to judge whether a complaint is reasonable or whether praise is deserved.

    Driving instructor explaining lesson in car

    In terms of structured training, government-approved schools are typically required to deliver a minimum curriculum covering theory and in-vehicle hours. While requirements vary by country, the principle is consistent: there is a floor below which a school cannot legally operate. Audits in several jurisdictions have also found schools issuing certificates without completing the required training hours, which is precisely why accreditation alone is insufficient to judge quality.

    Most beginners need between 10 and 15 hours of professional instruction to reach test standard, though this varies considerably depending on prior experience and natural aptitude. When a school’s reviews consistently mention students requiring far more hours than expected, it may signal inefficient teaching rather than pupil difficulty.

    The table below outlines what you should reasonably expect from a reputable school, and what strong reviews typically confirm.

    Standard What reputable schools deliver What strong reviews confirm
    Instructor qualifications Fully licensed, trained instructors Students mention confidence in their instructor
    Curriculum transparency Clear lesson plans and progress updates Reviewers describe structured, progressive learning
    Vehicle safety Modern cars with dual controls Mentions of calm, safe driving environment
    Pricing clarity No hidden fees or pressure to buy blocks Positive notes on value and upfront pricing
    Pass rate honesty Figures backed by student data Consistent mentions of first-time passes

    Driving schools also accept a form of duty of care toward their students. Schools should carry professional liability insurance to protect students in the event of training-related incidents. This is rarely something you’d find in a review, but it’s worth asking about directly, particularly for younger learners whose parents are involved in the decision.

    Using reviews and accreditation to make your choice

    With a clearer picture of what each measure tells you, here is a practical process for choosing a driving school with confidence. Think of it as a two-stage filter.

    1. Start with accreditation as your entry requirement. Any school you consider should be approved by the DVSA in the UK. Use the official DVSA register to confirm this before reading a single review. This removes schools operating illegally and narrows the field quickly.
    2. Read reviews on a verified platform. Trustpilot, Google Reviews, and similar platforms carry weight because reviews are harder to fabricate at scale. Look for schools with at least twenty reviews and a clear pattern of feedback. Fewer than that and the sample is too small to be reliable.
    3. Ask specific questions before booking. Use accreditation as a legitimacy filter, then use reviews to frame your questions. If multiple reviewers mention unclear pricing, call the school and ask for a full breakdown before committing. Pay attention to how quickly and clearly they respond.
    4. Look at what the school does not say. A school that avoids mentioning its first-time pass rate on its website, or provides no information about instructor qualifications, is worth questioning. Transparency in pricing, curriculum, and credentials is a mark of a school that has nothing to hide.
    5. Book a trial lesson before committing to a course. A warm-up lesson gives you direct experience of the instructor’s style, the vehicle condition, and the school’s punctuality. For intensive or accelerated driving courses, this is especially worth doing before paying for a block of hours.

    You can also find useful comparison guidance and tips on the Pass4you driving blog if you want to explore what experienced learners look for when evaluating schools.

    My honest take on reviews and what they really reveal

    What I’ve found, after years of working in driver training, is that most learners either over-rely on accreditation or dismiss it altogether. Both are mistakes. Accreditation tells you the school cleared a minimum bar. It does not tell you that bar was high, or that the school is still clearing it today.

    What I’ve seen in reviews that genuinely signals quality: specificity. When a student writes “my instructor explained clutch control three different ways until it clicked,” that’s a school delivering real teaching. When reviews say “great experience, passed first time” without any detail, I take that with a pinch of salt.

    The thing that worries me more than bad reviews is silence. A school with very few reviews, or reviews that all sound slightly too polished, is often one where someone has been managing the narrative. Authentic feedback is messy. It includes a mix of praise and minor gripes, and the school’s response to the gripes tells you as much as the gripes themselves.

    In my experience, the schools worth trusting are transparent about what they cannot guarantee alongside what they can. A school that promises every student will pass first time is not being honest. A school that says “our instructors will give you every tool you need, and here are the results we’ve achieved” is telling you the truth.

    — Simon

    Why Pass4you stands apart in Milton Keynes

    If you are based in Milton Keynes and ready to start your lessons, the quality of your instructor matters more than almost anything else. Pass4you has built a reputation for exactly the kind of honest, structured teaching that strong reviews describe.

    https://pass4you.co.uk

    With an 83.33% first-time pass rate well above the local average, fully qualified instructors, and modern dual-control Volkswagen vehicles, Pass4you delivers the kind of experience that shows up clearly in verified Trustpilot feedback. Whether you are starting from scratch or looking to fast-track your progress, their learner driving courses are designed to build genuine confidence, not just tick boxes. Book a lesson today by phone or email and take the first step toward passing with a school that has the reviews to back up its promises.

    FAQ

    What does a driving school review actually measure?

    A driving school review is a public assessment written by a past student, covering their real experience of instruction quality, scheduling, pricing, and overall value. Unlike accreditation, it reflects what lessons actually feel like rather than whether a school meets minimum legal standards.

    What does driving school accreditation mean?

    Accreditation means a regulatory authority has confirmed the school meets the minimum legal requirements to operate and provide driving tuition. It is a legitimacy filter, not a quality rating, and should always be used alongside student reviews when choosing a school.

    How do I spot a trustworthy driving school review?

    Look for reviews that include specific detail about the instructor, the lesson content, or the test result rather than vague praise. Also check how the school responds to negative feedback, as dismissive or absent responses are a reliable warning sign.

    Can an accredited school still have poor reviews?

    Yes. Audits have found that some accredited schools have issued certificates without completing required training hours, which shows that official approval does not guarantee consistent quality. Reviews often surface these problems before regulatory bodies do.

    How many reviews should a driving school have before I trust them?

    Aim for at least twenty verified reviews on an independent platform before drawing conclusions. Fewer than that and the sample is too small; any school can have five satisfied customers but a poor record overall.