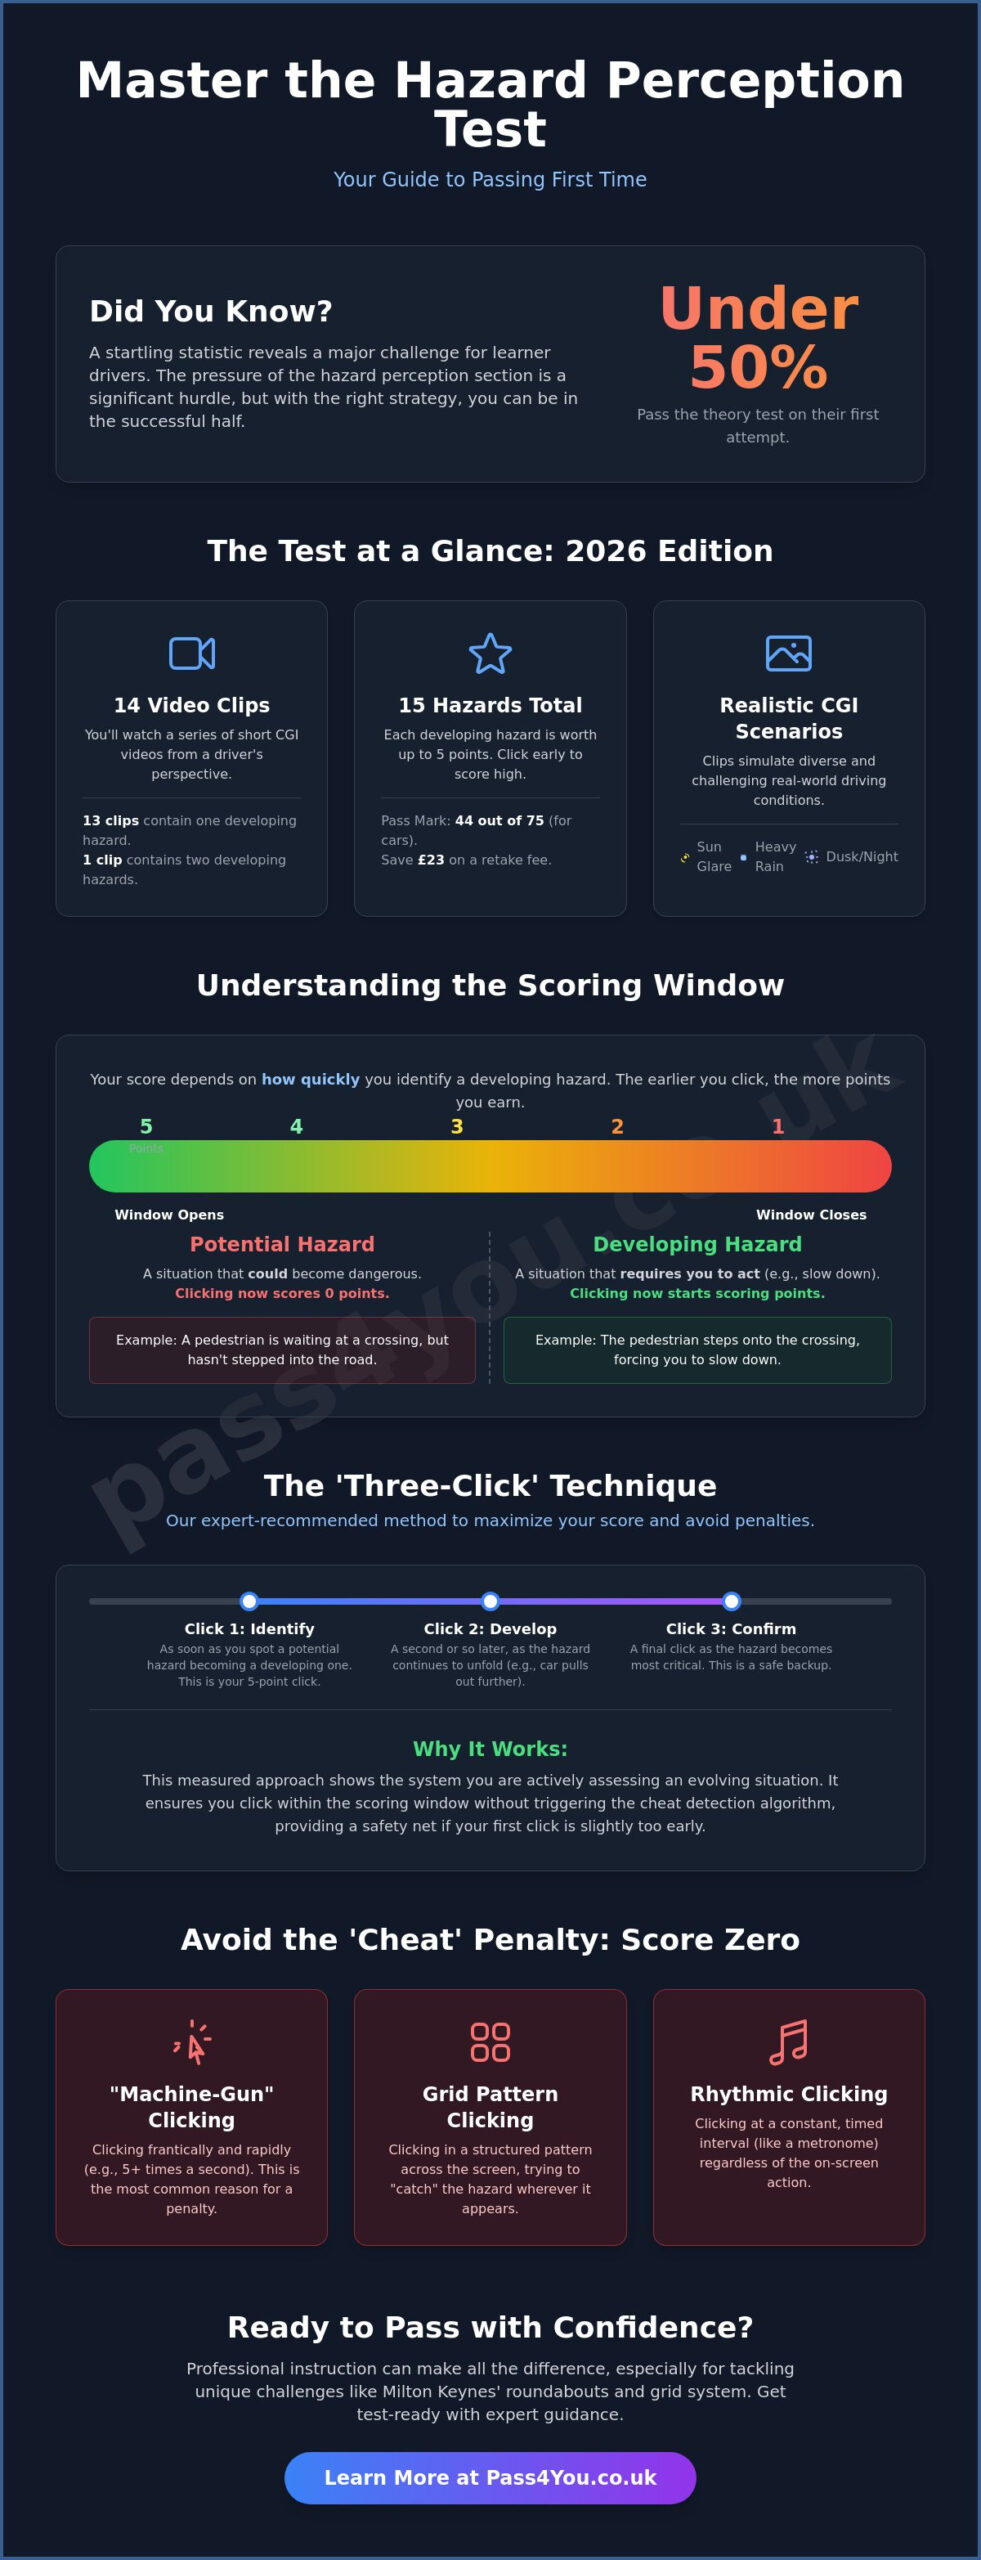
Did you know that less than 50% of learners pass their theory test on the first attempt? It is a startling figure, but it often comes down to the pressure of the hazard perception section rather than a lack of knowledge. You might feel anxious about the CGI clips looking unrealistic or fear that clicking too soon will trigger a penalty and leave you with zero points. It’s frustrating to feel like you’re a safe driver in person but struggle to prove it on a screen.
We understand these concerns and want to help you feel completely prepared. By mastering specific hazard perception test tips, you can learn to identify the exact moment a potential hazard becomes a developing one. This guide will teach you the professional “three-click” technique to ensure you hit the scoring window every time. We’ll also break down the rhythm of the 14 video clips so you can walk into the test center with confidence, pass first time, and save yourself the £23 retake fee.
Key Takeaways
- Learn how the latest CGI clips simulate real-world conditions to help you stay calm and focused during your test.
- Discover the clicking patterns that trigger the DVSA “cheat” penalty and how to avoid being disqualified for a clip.
- Master our expert hazard perception test tips, including the “Three-Click” technique to help you secure the highest score possible.
- Identify the difference between potential and developing hazards using professional scanning methods like the “L-shaped” scan.
- See how professional instruction prepares you for the specific challenges of the Milton Keynes grid system and roundabouts.
Understanding the Hazard Perception Test in 2026
Success on the road starts with awareness. The Hazard Perception Test is the vital second half of your UK driving theory test, and it’s where many learners feel the most pressure. In 2026, the test uses advanced CGI clips to simulate the unpredictable nature of real driving. These clips aren’t just basic animations. They recreate diverse weather conditions, from blinding sun glare to heavy rain, and varied lighting like the tricky shadows of dusk. This technology ensures you’re prepared for more than just a sunny day on a quiet road. It helps you build the skills needed for long-term safety and gives you the freedom to drive with total peace of mind.
During the test, you’ll watch 14 clips. Thirteen of these feature a single hazard, while one contains two, making a total of 15 hazards to spot. Each is worth up to 5 points. The goal is to identify the “developing hazard” as early as possible. A developing hazard is a situation that would require you to change your speed or direction. Using the right hazard perception test tips will help you find the rhythm of these clips and stay calm under pressure. We believe that with the right guidance and a patient approach, you can master this section with ease. It’s about training your eyes to scan the road effectively and reacting with confidence.
Potential vs. Developing Hazards: The Critical Difference
Many students struggle to know when to click. The difference lies in the transition from “potential” to “developing.” A potential hazard is something that could happen, like a car parked on the left. It only becomes a developing hazard the moment it starts to pull out. Understanding this distinction is the key to timing your clicks. You want to show you’ve seen the change, not just the environment.
The Scoring Window Explained
The scoring window is the period when you earn points. It opens the moment a hazard begins to develop. To secure all 5 points, you need to click right at the beginning of this window. If you click too early while the hazard is still just “potential,” you will score zero. Mastering these hazard perception test tips ensures you don’t hesitate and lose easy points.
How the Scoring System Works (and Avoiding the ‘Cheat’ Penalty)
Understanding the scoring mechanism is the best way to calm your nerves before the big day. The DVSA uses a highly sensitive algorithm to ensure the test remains fair and accurate. According to official government guidance, the system is specifically designed to detect “rapid, rhythmic, or repetitive” clicking. If you try to “beat the system” by clicking constantly across the screen, a red flag warning will appear. This results in an immediate score of zero for that specific video clip. With a 47% rise in recorded cheating incidents in the year leading up to September 2025, the software is more vigilant than ever, so it’s vital to play by the rules.
You don’t need to worry about being penalised for a few extra clicks. The software understands that real drivers might react more than once as a situation evolves. You only trigger the penalty if your clicking looks like a machine or a pre-set pattern. There are “invisible” scoring zones on the screen that follow the hazard as it moves. As long as your clicks are genuine responses to what you see, you’re in safe hands. Incorporating professional hazard perception test tips into your practice will help you understand this boundary clearly.
What Triggers the Cheat Detection?
The system is looking for specific behaviours that suggest a candidate isn’t actually watching the road. These include:
- Machine-gun clicking: Pressing the mouse button five or more times in a single second.
- Grid patterns: Clicking in a structured way across the entire screen to try and “catch” the hazard.
- Rhythmic clicking: Clicking at perfectly timed intervals, like a metronome, regardless of what is happening in the clip.
Many learners believe the myth that you should only click once per hazard. This is actually risky. If you click a fraction of a second too early, you score zero. Clicking two or three times as the hazard develops is a much safer strategy. If you’re feeling unsure about your timing, the team at Pass4you Driving School can provide the reassurance and guidance you need to feel test-ready.
Managing Your Nerves During the Test
Anxiety often leads to “panic-clicking,” which is the fastest way to trigger a penalty. If you think you’ve missed a hazard, don’t try to compensate by clicking rapidly afterward. Just take a breath and focus on the next potential danger. We recommend using a “re-centre” technique between clips. Close your eyes for a second, relax your shoulders, and look at the centre of the screen before the next video starts. Staying calm helps you maintain the focus needed to apply your hazard perception test tips effectively and secure that first-time pass.
The ‘Three-Click’ Technique: Your Secret Weapon for Success
Clicking at the perfect moment is often the most stressful part of the theory test. You might see a hazard starting to unfold, but if you react a fraction of a second too early, you score zero. If you wait too long to be “sure,” you might only get one or two points. The ‘Three-Click’ technique is a professional strategy we often share at Pass4you Driving School to help students navigate this uncertainty with confidence. It is a simple, rhythmic approach designed to “bracket” the scoring window. This means you aren’t just guessing; you are creating a safety net for your score.
This method is highly effective because it accounts for the transition period between a potential hazard and a developing one. By spreading your reactions, you ensure that even if your first click is premature, your subsequent clicks will land squarely in the high-scoring zone. It is one of the most reliable hazard perception test tips for anyone worried about the sensitivity of the CGI clips. Instead of feeling anxious about a single “make or break” click, you can stay calm and follow a proven system that secures your pass while keeping you well away from the cheat detection software.
Step-by-Step: Implementing the Three-Click Method
To use this technique effectively, you need to identify the moment a situation begins to change. Let’s look at how to apply it during your test:
- Click 1: Press the button the moment you see a potential hazard. This might be a pedestrian standing near a zebra crossing or a car indicating at a junction.
- Click 2: Wait exactly one second, then click again. This is usually the moment the hazard starts to develop, such as the pedestrian stepping onto the road.
- Click 3: Wait one more second and click a third time for safety. This covers you if the CGI animation has a slightly longer development phase than expected.
This deliberate sequence ensures you capture the maximum points available without appearing erratic to the system. It mirrors the natural way a safe driver processes information on the road, making it a life-saving skill as much as a test-taking strategy.
Why the One-Second Pause is Vital
The pause between clicks is the most important part of this method. According to the official government guidance on the hazard perception test, you must react to the hazard as it develops. If you click too quickly in a “machine-gun” fashion, the anti-cheat algorithm will flag your behaviour and disqualify the clip. A one-second gap mimics natural human reaction time. It gives the software clear evidence that you are responding to visual changes on the screen. This rhythmic approach is one of our top hazard perception test tips because it balances the need for speed with the requirement for accuracy, ensuring you walk out of the test centre with a successful result.
Identifying the 10 Most Common Developing Hazards
Developing your scanning technique is about more than just watching a screen. It’s about training your brain to see what others miss. Many learners make the mistake of focusing on the “hood” of the car in the CGI clips. Instead, you should look deep into the horizon. We recommend using the “L-shaped” scan. This involves looking left, then right, and finally deep into the distance. By applying these hazard perception test tips, you’ll move from simply reacting to situations to anticipating them before they even happen.
Anticipation gives you the freedom to drive without the stress of sudden surprises. It’s a skill that builds your confidence and keeps everyone safe. Whether you’re in a busy city or on a quiet country lane, the hazards you’ll encounter fall into predictable categories. Understanding these patterns is your best defense against missing a scoring window. If you want to practice these skills in a real car, our team at Pass4you Driving School is here to support you with professional driving lessons tailored to your needs.
Urban Hazards: Pedestrians and Junctions
In town centers, the environment is cluttered and moves quickly. You need to look for subtle clues. One of our favorite hazard perception test tips is to look for feet under parked cars. This often reveals a child about to run into the road before you can see their body. You should also watch for cyclists at junctions. They can be obscured by larger vehicles or move suddenly to avoid obstacles like potholes. Finally, always be wary of buses. A bus at a stop is a potential hazard, but it becomes a developing one the moment the indicator flashes or a pedestrian steps out from the front of it.
Rural and High-Speed Hazards
Country roads might seem quiet, but they require high-level scanning. Blind bends are a classic hazard. You should treat every sharp corner as if a large tractor or HGV is coming the other way. Look for hidden farm entrances where mud on the road might suggest a slow-moving vehicle has recently emerged. Animals are another major factor. In wooded areas, look for movement in the shadows that could indicate a deer or a loose farm animal about to cross your path.
Weather and Lighting Challenges
The 2026 test uses CGI to create very realistic environmental challenges. Sun glare is particularly tricky. It can make it nearly impossible to see brake lights or indicators if you aren’t focused. Rain also plays a role by reducing your visibility and increasing the distance you need to stop. During night-time clips, you’ll need to identify hazards by their silhouettes or the reflection of headlights on road signs. Staying calm and maintaining your rhythmic scan will help you spot these hazards even when conditions are less than perfect.
From Theory to the Roads of Milton Keynes: Why Professional Instruction Matters
Transitioning from a computer screen to the driver’s seat is an exciting milestone. While the CGI clips provide a solid foundation, applying hazard perception test tips in a real-world environment is where your skills truly come to life. In a city like Milton Keynes, the road network presents challenges you won’t find in a standard simulation. Our instructors at Pass4you ensure that every one of your driving lessons in Milton Keynes builds on what you’ve learned for your theory pass. We believe that seeing a hazard in person is the best way to reinforce the “three-click” rhythm you’ve practiced.
The famous grid system and numerous roundabouts in our city require a high level of constant scanning. Unlike a video clip, real hazards don’t always have a clear “start” point. You have to manage 360-degree awareness while maintaining your speed and position. Professional instruction helps you spot these dangers faster than any app because a mentor can point out the subtle “tells” of other drivers in the moment. This hands-on experience turns the abstract scoring windows of the theory test into practical, life-saving habits.
Mastering Milton Keynes Roundabouts
Approaching a roundabout in Milton Keynes requires you to look for “early” hazards long before you reach the yield line. You aren’t just looking for cars already on the circle. You’re watching for lane-discipline errors from drivers who might be in the wrong lane for their exit. This is a classic developing hazard that requires a change in your speed or direction. We focus on active eye movement and frequent mirror checks to ensure you’re never caught off guard by a sudden lane change from another vehicle.
Why Our 83.33% Pass Rate Matters for You
We take great pride in our 83.33% pass rate because it reflects our commitment to your success. Our teaching methods focus on efficiency, which saves you both time and the cost of unnecessary retakes. We don’t just want you to pass a test; we want you to be a safe, confident driver for the rest of your life. Before you head to the test centre, you can book a mock test with us to see if you’re truly ready for the practical driving test. This extra layer of preparation helps alleviate any remaining anxiety.
Next Steps: Booking Your Theory and Lessons
Ready to get started? Make sure your provisional license uk is in order before you look for a test date. Once you have that, follow our how to book your driving test guide to secure your theory appointment. Using our hazard perception test tips alongside professional training is the most reliable way to secure your pass. The road to freedom is closer than you think. Contact Pass4you today to start your driving journey in Milton Keynes!
Secure Your Success on the Road Today
Passing your theory test is a major milestone on your path to independence. By mastering the hazard perception test tips we’ve shared, from the “three-click” technique to the “L-shaped” scan, you’re building a foundation for safe driving that lasts a lifetime. You now have the strategies to avoid common pitfalls like the cheat detection system and the confidence to identify hazards before they develop. This knowledge doesn’t just help you pass; it keeps you and others safe on every journey you take.
Now it’s time to put that knowledge into practice. We’re proud of our 83.33% first-time pass rate and our team of patient, first-class instructors. You’ll learn in modern Volkswagen tuition vehicles, ensuring your experience is as comfortable and safe as possible. Start Your Journey with Milton Keynes’ Top-Rated Driving School and see how professional support makes all the difference. We’re here to help you every step of the way, and we can’t wait to see you succeed behind the wheel.
Frequently Asked Questions
How many hazards are in the hazard perception test?
You will watch 14 video clips featuring 15 scorable hazards in total. Most clips contain one developing hazard, but one special clip features two. You won’t be told which clip has the extra hazard, so it’s important to stay alert until the very end of every video. This ensures you capture every possible point toward your final score.
Can you fail the hazard perception test for clicking too much?
Yes, the system will award zero points for a clip if it detects a pattern of rapid or repetitive clicking. This “cheat penalty” only applies to the specific video you are watching, not the entire test. By using the hazard perception test tips we’ve discussed, such as the “three-click” method, you can safely capture points without triggering this warning.
What is the pass mark for the car hazard perception test in 2026?
The pass mark for car and motorcycle learners is 44 out of a possible 75 points. Each of the 15 hazards is worth up to 5 points, depending on how quickly you react once it begins to develop. We focus on helping you hit those high-scoring windows consistently so you can walk into the test centre feeling calm and prepared.
Is the hazard perception test harder than the multiple-choice theory part?
Many learners find this section more challenging because it requires real-time awareness rather than just memorising facts. While the multiple-choice part tests your knowledge of the Highway Code, this section tests your practical reactions. Since the theory test pass rate is less than 50%, it’s clear that both parts require dedicated practice to pass first time.
Can I retake the hazard perception test if I fail?
You can retake the test, but you’ll need to book and pay for the entire theory test again. This includes both the multiple-choice questions and the hazard perception section. You must wait at least three working days before you can try again. This is why we emphasize efficiency and professional guidance to help you save time and money.
How long is the hazard perception test scoring window?
The scoring window opens the exact moment a hazard begins to develop and ends when the situation is no longer avoidable. This window usually lasts for just a few seconds. To score the maximum 5 points, you need to click right at the start. If you wait until the hazard is obvious, your score will drop significantly.
Are the CGI clips in the test realistic?
The CGI clips used in 2026 are highly realistic and designed to mimic modern driving conditions. They accurately simulate challenging environments such as heavy rain, blinding sun glare, and low-light night driving. These animations provide a safe way to test your reactions to dangerous situations without the risks of real-world driving, helping you build confidence.
Do I need to use a mouse or a touch screen for the test?
You will use a standard computer mouse to complete the test at the official DVSA centre. Touch screens are not used for the hazard perception section. We recommend practicing with a mouse at home so you feel comfortable with the physical clicking rhythm. This small detail helps reduce test-day anxiety and lets you focus entirely on the screen.